Raspberry Pi is teaching me new tricks
For an upcoming Art project, I needed to make a few things using a Raspberry Pi 3. And while I have not yet figured out a neat way of setting the wifi configuration wirelessly (as they did for ESPlink), I have made some progress on other fronts needed and configuration-related.
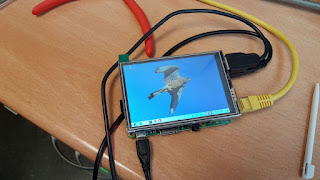
First thing on the list was to make the RPi3 work with a 3.5" color LCD with touchscreen. It was simple once I followed the right set of instructions. Not sure if the display can be kept on while using the HDMI output but guessing no I removed the HDMI output for all my testing. This LCD display is 480x320 resolution and it can work as a minimum display for both text console and X11. You just do not want to browse the web with that.
While the display worked nicely, I wanted it to be kept working all the time but the power saving settings disabled it after being idle for a while. A bit of googling led me to a nice solution: to add the line xserver-command=X -s 0 dpms to /etc/lightdm/lightdm.conf. And oce reboot later the display is on all the time. Good.
I also wanted to show a fix image on the display once the system was on without windows decorations of a mouse pointer. So I created a simple Java program that handles the first part and used this solution for taking care of the second one.
Another part of the job is to figure out the IPv4 addresses of the RPi3 once it has successfully connected to a wired or wireless network (so I can connect to it as I have open the ssh service). For that I used a simple python program I wrote. The code will broadcast (using UDP) the network configuration of Ethernet and Wifi interfaces on the RPi3. If you have a laptop sharing the same network you can receive it using the conmmand nc -w 1 -ul 55555


Comments