Posts

Showing posts from 2021

What is IDEX 3D printing all about?

Image
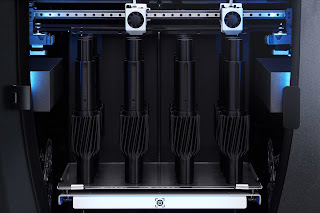
  While single extruder performance with BCN3D Epsilon W50 was not fast (around 20% slower than a Prusa MK3) its printing volume is significantly larger. So we put that to some u se, packing several large parts into the print bed.  If some of these parts are similar (either equal or mirrored) the use of IDEX can help here. So what is IDEX? IDEX is the acronym of independent dual extruders, which may not explain much yet.  These are 3d printers that have two print heads instead of one. Each one of these two print heads has its own extruder that can be operated independently from the other. This is quite a different thing than these other printers that can handle different filaments in the sense that here two extruders can operate at the same time, so two hotends can be pushing plastic onto the bed to create two different parts. Not very different as if you were able to write or draw with a pen on each one of your hands, but with a little catch here: although we can draw two lines at th

When epsilon is actually quite large ...

Image
Before the summer holidays, we were approached by a Spanish company ( Sicnova )  that wanted to help us with our research project about modular 3D printed beams . So after some talks, we borrowed a brand new BCN3D Epsilon W50 3D printer.  Contrary to other printers and similar to an industrial robot, the machine was delivered over a wooden pallet that needed a manual forklift to move it to our lab. Overall volume was not very different from a washing machine or dishwasher. I went to the lab for unpacking it but returned empty-handed: the instructions called for two people for the unboxing procedure. So I had to return the next day with a colleague so we could remove the packaging and rise the printer to the workbench where it will live. Once the printer was powered on, we noticed the nice touch-sensitive display on the bottom-right corner, that greeted us and guide us through the setup procedure.  The printer has a USB, Ethernet, and WiFi connectivity, but we were not prepared to netw

What happened to Meshlabserver?

Image
A few days ago, one reader comment on the blog (thank you Lance) made me aware of the changes happening with the Meshlabserver program. I misread the comment first as if the MeshLab project was discontinued, and after checking I replied back that a new released was just a few days old. But then it hit me, Lance was spot on,  MeshLab  project was deprecating the Meshlabserver program, now becoming "unsupported" and users were diverted to a new program called  PyMeshLab  which, as you all can guess, is now Python-based.   So that was interesting news for me as I have been using meshlabserver for various automation processes dealing with 3D meshes. And the even better news is that now installing it should be quite simple, just type pip3 install pymeshlab.  Linux and OSX install was uneventful and it all worked as expected. I learned that you could even use .mlx files created with Meshlab software. Windows 10 install was equally simple but, once I imported the library in Python I

Upgrading from Prusa SL1 to SL1S

Image
 A while ago I bought a Prusa SL1 resin printer with a washing and curing unit called CW1, both from Prusa Research. They came as a bundle and while the price was significantly higher than existing cheap SLA printers from China, I bit the bullet and went ahead with a more expensive set that I thought it will be worth it.  The printer I bought was a kit to be assembled and from the very beginning, I could see there were a lot of quality components and advanced features. All in all, I have used the printer only a fraction of what I use my FDM printers. The main reason being the messy process associated with resin, even if you have a cleaning and curing unit (that helps on that front). The smell of the resin is yet another detail I do not like, though it is not much worse than printing ABS. But recently I had the opportunity to install an upgrade to my SL1 printer. I have heard of different manufacturers replacing color LCD screens with monochrome ones, that while maybe more expensive, di

Garbled OLED display

I was testing the SD1306 MicroPython library for a small OLED display I just received. It uses the I2C bus and it is 128x64 pixels monochrome. I have used a smaller one before with that library and it seemed a no-brainer.   Unfortunately, I was not sure the unit was operational as it was brand-new and could be defective. I could only see the text I sent to the display for an instant and then only a fixed garbled background that was impossible to remove. I searched away until I found a Reddit post that summarized my problem exactly: It turned out very similar displays are sold, often without the seller specifying what model is being sold. So the OLED display SH1106 was the one I received and, if you use the SD1306 library with it, you get a garbled display.  Once I reverted to the right library, everything worked as expected. As usual, I would love not to make these mistakes, but this is a reminder about the importance of making sure what part you are buying EXACTLY!! 

Thonny with the ESP32

Image
 When I presented to my students the use and features of rshell so they can use it for MicroPython development they were not impressed at all. So I started to look for a Python GUI  that could work well with a ESP32 using MicroPython. I needed a multiplatform solution and then I saw an add on Udemy about an online course by Peter Dalmaris. I saw a sample video about Thonny software where I learned there is  a set of different platforms supported by that tool, as it can be used not only for Python programming on your PC but also on several MicroPython targets, such as the ESP32, which is supported out of the box. Easy to install and set up, I was sold from minute one, as it makes it easy to have access to the ESP32 filesystem. It can even upload MicroPython to the ESP32 so students do not need to fiddle with command-line esptool.py software.  I recommend you giving Thonny a go if you are using MicroPython on an ESP32. It even includes a serial plotter function similar to the one found

Microptyhon on the ESP32: file management

Image
 While some boards using MicroPython have processors with built-in USB supports, the ESP32 is not one of those. That basically means the ESP32 needs an auxiliary chip to connect to a USB port. But it also means the preferred connection is to emulate a serial connection. Chips like the FTDI's USB to serial, or CP1202, or the CH340G, all are seen as a COM port on the PC side. And here is where the difference matters, as a serial communication matches well the REPL interpreter, but it also prevents the device to appear as any other device to your system (no mouse, no keyboard, no mass storage device). And that is a problem as MicroPython usually relies on the host system to have access to the local storage on the MicroPython device so different files and libraries can be edited a replaced during the development phase. What does no change, however, is that MicroPython still can have access to the local file system. Just try:  import os os.listdir() So, one way of dealing with this limi

Extra memory for your F411 blackpill using Micropython

Image
 Like many of you, I bought a sample blackpill just for testing purposes with no special need to address. Later on, I learned that several flavors of Python were available for these boards and I gave them a try, both MicroPython and CircuitPython worked ok. But I read on the comments on a Hackaday entry about the board that the 8-pin chip that was not soldered in the bottom was a provision for an SPI flash memory. Again, I had no particular need for more memory, as the current 32KB flash drive that MicroPython exposed was ok, but you never know when you might need more memory. And sooner than later you find that need for extra memory. So I ordered a W25Q128F chip for around $1 and I soldered it to the board when it arrived.  However, none of the Python binaries I had changed the size of the exposed flash drive when I connected the USB to my computer. So I went on a quest to learn how to make it work . I failed to find meaningful references online until I visited the WeAct github repo: 

Coding 3D parts in Python using FreeCAD

Image
For quite a long time I have been a happy user of OpenSCAD software, mostly for designing 3D printed parts. For a recent project, I needed to create a complex geometry, and my starting point was a data file, so it made a lot of sense to that with a program.  Having been using OpenSCAD for a long time, I got the job done with it but creating the STL file took more than 10 hours. I could live with that, but I was not looking for an STL file as an output but a STEP or BREP file instead. So I started reviewing what I could do in Python using FreeCAD. It turned out that I could do a lot, but it was not as easy as using OpenSCAD. And it was not very fast either, but I could get it working in the end. The code below is what I used to create the model of the image of the cube, but for reasons unknown, all the shapes are hidden (not visible) when I open the file with FreeSCAD. It is very simple but, although there is a lot of documentation out there, I did not find all of it when I was looking