Enabling wireless uploading of jobs to a stand-alone CNC controller
I explained a while ago how I set up a farm of CNC routers. At that time a combination of an Android tablet and an Arduino running Marlin was a good compromise for a DIY system.
Over the years, one thing that was demanded was to have controllers that are a single machine (as the USB cable from the tablet to the Arduino creates problems at times due to machine's vibration).
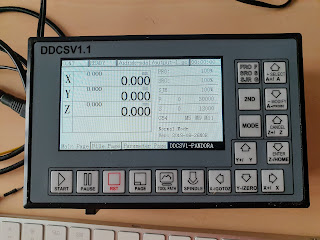
Several options are available in the marketplace of small and affordable CNC controllers that require no computer and can run jobs off a USB pen drive. No computer or tablet required. One of such a system, running Linux, with a nice display and keyboard, is the Digital Dreams units DDCSV1.1 and above.
I bought one unit a couple of years ago but it was never used, but now I am giving it a try on a test machine, where we want to reach 5000 mm/s^2 accelerations and speeds above 30 meters per minute and the fact that unit could create step pulses at a 500kHz rate really caught my attention. It can do that not because it has a very powerful processor but because stepper signals are driven by an FPGA under the supervision of the main processor.
The first try was a bit disappointing as the unit would freeze mid-job. However, after upgrading the firmware the unit started to work flawlessly and wanted to use it to replace the old setup. However, one thing that I did not want to give up was the ability to upload the jobs wirelessly to the controllers. Unfortunately, these units did not have any network or serial connection. Just a USB port that was used to connect the pen drive.
After reading a really long thread on this forum, I realized I could use a PL2303 USB to serial adapter to obtain a shell over the serial terminal. But as there was just one USB port, I would need to use a USB hub to be able to connect both, the USB to serial adapter and the USB pen drive ( needed as I did not want to be writing files to the system's flash memory).
The next step was to connect this serial port to another board that will expose it to TCP connections through wifi. The plan was to use ESP-Link software (also mentioned in an early post).
Unfortunately, I ended up dropping the plan as I did not get a stable system once I added a USB hub to the system. But, as I knew there was a serial console inside of the box, the next step was to open the box and see what is inside:

The header was not soldered but I could connect to GND, TXD and RXD and I would get a serial console at 115200 bps (not very fast but fast enough for my upload needs). I connected that to my computer through a 3.3 volt USB to serial adapter and I was able to test that it was, in fact, working no problem. And this way I would not need to use a USB hub so the system should work rock solid.
After making sure the controller supply could handle the load of the ESP8266, I connected it to the + wire of a missing electrolytic capacitor as in the picture below:

I have previously installed the ESP-link firmware on the ESP8266. So once connected I could see a new wifi network in my computer, named ESP_XXXXXX, where the Xs match the last digits of the module's MAC address. Connecting to this new network and pointing the browser to http://192.168.4.1 would lead you to a page like this one:

In there you can configure which GPIO pins of the ESP8266 are used for the serial port and all the details about the wireless connection. Initially, the ESP8266 will act as an access point creating a new SSID. However, you can configure it to join your existing wireless network if you want to.
Once all has been set up properly (assuming you use the ESP8266 as an access point) you can connect to the CNC controller console with the following command in your computer: nc 192.168.4.1 23
My plan is to use this serial console to upload the gcode files to the CNC controller by using the cat command over the terminal. It is not a problem as gcode files are ASCII files. And the file upload will finish with a Ctrl+C sequence (which is character 0x03). Files will be stored on the controller's pen drive and later can be selected by the user to be machined.

Over the years, one thing that was demanded was to have controllers that are a single machine (as the USB cable from the tablet to the Arduino creates problems at times due to machine's vibration).
Several options are available in the marketplace of small and affordable CNC controllers that require no computer and can run jobs off a USB pen drive. No computer or tablet required. One of such a system, running Linux, with a nice display and keyboard, is the Digital Dreams units DDCSV1.1 and above.

I bought one unit a couple of years ago but it was never used, but now I am giving it a try on a test machine, where we want to reach 5000 mm/s^2 accelerations and speeds above 30 meters per minute and the fact that unit could create step pulses at a 500kHz rate really caught my attention. It can do that not because it has a very powerful processor but because stepper signals are driven by an FPGA under the supervision of the main processor.
The first try was a bit disappointing as the unit would freeze mid-job. However, after upgrading the firmware the unit started to work flawlessly and wanted to use it to replace the old setup. However, one thing that I did not want to give up was the ability to upload the jobs wirelessly to the controllers. Unfortunately, these units did not have any network or serial connection. Just a USB port that was used to connect the pen drive.
After reading a really long thread on this forum, I realized I could use a PL2303 USB to serial adapter to obtain a shell over the serial terminal. But as there was just one USB port, I would need to use a USB hub to be able to connect both, the USB to serial adapter and the USB pen drive ( needed as I did not want to be writing files to the system's flash memory).
The next step was to connect this serial port to another board that will expose it to TCP connections through wifi. The plan was to use ESP-Link software (also mentioned in an early post).
Unfortunately, I ended up dropping the plan as I did not get a stable system once I added a USB hub to the system. But, as I knew there was a serial console inside of the box, the next step was to open the box and see what is inside:

The header was not soldered but I could connect to GND, TXD and RXD and I would get a serial console at 115200 bps (not very fast but fast enough for my upload needs). I connected that to my computer through a 3.3 volt USB to serial adapter and I was able to test that it was, in fact, working no problem. And this way I would not need to use a USB hub so the system should work rock solid.
After making sure the controller supply could handle the load of the ESP8266, I connected it to the + wire of a missing electrolytic capacitor as in the picture below:

I have previously installed the ESP-link firmware on the ESP8266. So once connected I could see a new wifi network in my computer, named ESP_XXXXXX, where the Xs match the last digits of the module's MAC address. Connecting to this new network and pointing the browser to http://192.168.4.1 would lead you to a page like this one:

In there you can configure which GPIO pins of the ESP8266 are used for the serial port and all the details about the wireless connection. Initially, the ESP8266 will act as an access point creating a new SSID. However, you can configure it to join your existing wireless network if you want to.
Once all has been set up properly (assuming you use the ESP8266 as an access point) you can connect to the CNC controller console with the following command in your computer: nc 192.168.4.1 23
My plan is to use this serial console to upload the gcode files to the CNC controller by using the cat command over the terminal. It is not a problem as gcode files are ASCII files. And the file upload will finish with a Ctrl+C sequence (which is character 0x03). Files will be stored on the controller's pen drive and later can be selected by the user to be machined.


Comments