Basic 2D CNC milling workflow
I needed for a project some metal holder plates for nema 23 motors. As I have in the lab a Chinese 6040Z CNC router I thought it will be an easy thing to do. Oh boy, how wrong I was.
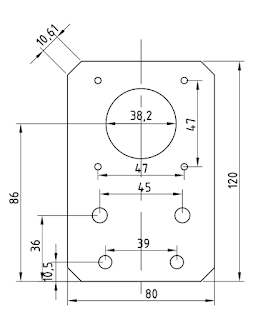
They project was a simple plate (very easy to sketch using OnShape).
Once it was sketched a 3D part could be created by simply extruding it, which may come in handy if some drawing assembly needs to be done for documentation purposes.
However, for 2D projects a 3D model of the part is not really needed for the process of creating 2D machining code. There are different solutions out there that are free, but one that I like because it is very simple to use and it is on-line is makercam.com but for that you will need an SVG file instead of the DXF that OnShape can easily produce.
I usually use Inkscape software for converting to and from SVG and DXF. I did so in this case and it worked as expected.
So, once I have got the SVG file I can feed Makercam.com I need not to forget to change the default dpi value from 72 to 90 otherwise my part scale would be wrong. You need to select each line to decide which machining operation you need to perform. For this part I chose inside profile operations for all the holes and one outside profile operation for the outer profile of the part (it is important that one is done at the end, other wise your part will be cut loose and you will be in trouble with the rest of the machining until figure out a way to keep the part still).
With the profiles select you perform the desired operations and eventually generate on or more machining (g-code format) files. These will represent all the different movements of the cutting tool. Here you specify the height of the stock material and the depth of every cutting action. You will specify the feed-rate for cutting and non-cutting moves too.
Finally, using some software to send the g-code to your CNC machine you command the cutting tool to do exactly what the CAM software planned and, if you are lucky, you will obtain the desired part out of your stock material. In my case I was using aluminium and a CNC machine controlled by LinuxCNC software.
Unfortunately it was a no go, as something in the computer would make the x-axis motor to stop working every now and then (I was told maybe the BIOS setting of the port was wrong, but I gave up and use another computer).
Second computer was using Windows and Mach3 software and though it gave me some trouble with the larger holes (where my tool would be caught and x-axis would lose steps, but somehow I managed to fix it on the fly). But at the end I finished the parts with some sense of achievement.
Even when the parts were finished from the CNC machine some other manual processing was still pending like taping some holes and filing the edges. But all in all, it was a good experience.


Comments
The quicker way is to write yourself the needed gcode.
You made a lot of work with onshape, inkscape and other tools.
BR
Rafa
I guess if you do that on a daily basis you can likely write sound g-code by hand flawlessly (still some math needs to be done to calculate reference points and this takes time too.
For the rest of us, who are not used to that job, using a CAM program is most likely the easiest approach. Please note many CAM programs will directly accept the DXF you create from your CAD software, it is only Makercam which takes an SVG instead.
Rafa