Posts

What worked and what didn't.

Image
I know I have been not posting anything for a long time but the workshop preparation first and the fact that we scheduled a second edition just finishing the first one prevented me to do much besides that and my daily work. Certain things did not work quite right in the 3D printing workshop, like having to solder motor wires. Most people are not familiar with soldering and a soldering iron is a risk too. I ended up doing half of the soldering as another workshop attendant helped me out. On top of that, three printers have trouble with RAMPS cards, two of them with a non working motor and a third one with hotend thermistor input. Luckily all these failures were tracked down to soldering shorts that were easy to fix once diagnosed. Even better was the fact that nothing broke in the process. However, I failed miserably to stick to my own schedule and the software part of the workshop was much smaller that I have planned and wanted to cover. I felt a bit like a firefighter trying t...

There is always a catch

Image
After building several RepRap 3D printers and getting involved in several user forums about the matter I realized I was helping out other people building the same stuff I did a while ago and having a good time too. One of the good things about Open Source Hardware is that designers encourage people to build their designs whether they buy anything from them or not. I am helping out the people who try to make FabLab Valencia a success and a workshop for building 3d printers seemed like a good fit. I have never done an activity like this before and the logistics seemed like a nightmare that rather was other people's problem. So the plan was: I do the teaching at the workshop and we use some ready made kit for building Prusa i3 models. Just to be sure [I do not want to disappoint dudes that are shelling out almost $1,000] I decided to do a test run with one unit of the kit we have selected from a local manufacturer. That business was so brand new that ours was one of the first ...

LEDs getting smarter

Image
Sometime ago, I used for a project a set of RGB LEDs that were networked and responded to a few commands sent through a shared bus. It was a lot of work but it was fun. A while ago, at a RepRap meeting, user fungus showed me how he was using new controllers for doing exactly that, controlling RGB leds through a shared bus (daisy-chain would be the exact term though). They are available either as a small PCB with the chip so you can solder your own LED, or with a built-in LED or in a long stripe of LEDs. Other manufacturers just included the chip together with their RGB leds, so you can get a three pin RGB led that includes internal memory to be set at any desired color from a single-pin output of your favorite micro-controller. And my favorite during the last few years has been Arduino so I just downloaded the FastSPI library and try to make sense of it. Unfortunately it never is so easy, so this time I was forced to upgrade my Arduino to 1.0.4 (I was avoiding that and k...

Running in circles with the extruders

Image
While my Wade-type extruder works nicely in my old Prusa, I planned to use a smaller geared stepper motor for my new Prusa i3 3D printer. But the road to a reliable extruder that is lighter and smaller is paved with many different trouble. The first problem was to source PG35L-048 motors that Josef Prusa was using for his compact extruder and shown in different youtube videos. Sourcing it in Europe was not easy but I was lucky buying some units from an Austrian supplier called Neuhold Elektronik. But my joy was brief, once I could not easily extract the gear of the motor and I ended up sawing it off, because the shaft of my motor was shorter than the version used by Prusa, so I had to adapt the 3D design of the extruder to fit my motor. I got that extruder eventually working, but in order to get consistent extrusion the motor needed a bit more current than its specs so it was overheating. An aluminium piece, part of a heat-sink of an Intel processor took care of the extra heat. Still...

Heated bed blues

Image
Reprap 3D printers can benefit of having a heated bed because that helps preventing part's warping. When a part is printed, it is done depositing layer after layer of fused plastic filament. Either PLA or ABS, these fused filaments will experience some contraction when the melted filament solidifies and cools down. This effect will be more dramatic the faster it happens. And the end result is that some of your printed parts will have a round bottom instead of a flat one. And that is if you are lucky, as some parts will completely detach from the print bed mid print and they will be totally ruined. So we use a heated bed so the print bed is kept at a relatively high temperature. This way the filament will cool down not so fast and hopefully the parts will stay well grabbed to the print bed even in the corners. There are several ways of creating a heated bed: a printed circuit board with a long copper track zig-zagging the surface that will create a resistor. An aluminium p...

Getting back to SQL magic

Recently I was asked for a way of numbering a subset of records of database table. It could be done using a programming language, as I did with a small code in Visual Basic for Applications using MS Access connected through ODBC to the database server. But I wanted the real deal, so several ideas came to my mind. The first one was to transfer the desired rows to a temporary table, while deleting them from the original one to later create a new column of type serial that will handle the numbering. However, this idea was not possible as different set of rows required to have their own counter. Let's say that different cities required to have their sales numbered using independent counters. The solution I used was to create a temporary sequence value, to then update the table for each city value. Something like this in Postgresql: ALTER TABLE sales ADD COLUMN number; CREATE TEMP SEQUENCE counter; UPDATE TABLE sales set number=n FROM (SELECT nextval('counter') AS n, ord...

Tuning extrusion values

Image
After building the acrylic Prusa i3 3D printer is when the challenge began. I tried to get proper values for the compact extruder using a PG35L geared stepper motor and that proved to be quite a challenge. The problem was two-fold: on one hand, this is a small low-power stepper, that thanks to a 1:35 gear reduction it can achieve 0.45Nm of torque, but this motor is rated at 12V/180mA, which make it not ideal for our 12V drive voltage. But the motor needs a bit more current to create a bit more torque to obtain a consistent extrusion. The second problem is that due to the gear the motor skips if speed is too high. So retraction speed has to be dialed down to 7-10 mm/sec. Being the motor that slow is giving me more trouble, as retraction takes a while and I am getting some ugly plastic blobs in some corners. This time my troubles were deepened because I am using a [for me] new hotend I bought from one of my students, who bought a couple of them off eBay and only needed one....

A tablet that does it

Image
I have blogged in the past on how to use iPad for viewing electronic magazines and how it failed to me with some PDF files. I have recently got a Samsung's Note 10.1 tablet and I can certainly call it a success in terms of both PDF browsing and ebook reading. Everyone I have shown how to scribble on a PDF article was amazed. Yes, this unit comes with a stylus and it is a pressure sensitive one. Adobe reader works nicely and it does not crash. My benchmark is Circuit Cellar PDF that use to crash on the iPad (I do have an iPad1). This together with Cool Reader free app make the unit a very useful book reading plataform as it supports the common formats FB2, EPUB and MOBI plus CHM as a nice addition. The picture shows a screen capture at the original size, which is easy to read without zooming in.

On extrusions speeds

Image
I have been losing a fight with my latest extuder/hotend combination. It works ok as far as I do not want it to work too fast. I want to keep the PG35L motor not too hot or it will break. So I am powering at 500mA, which seems to be well beyond its maximum rated current, so it gets hot. But I've added a passive cooler to it so won't get dangerously hot. Should I used a higher current, as someone suggested, maybe my mileage might vary, but at the expense of needing a fan blowing directly to keep the motor from frying itself. One of the things that was bothering me was the maximum printing speed I could use with this new setup on my Prusa i3. Extrusion speed on Pronterface software (the host I use) is user selectable but measured in millimeters per minute, while travel speed is usually configured in the slicing software in millimeters per second. But doing the apparently simple math of dividing by 60 will not help here, among other things because the extrusion speed is the 3m...

Building a Prusa i3

I am very happy with the Prusa I built, and so I am with the Printrbot, which much smaller but it does a nice job too. In fact, most of the parts (on different shades of blue) of my new Prusa i3 have been printed with the Printrbot, but the black ones, which are ABS parts, have been printed with my Prusa. Having two working 3D printers seems to leave you in a difficult position to explain your wife why in hell you're building yet another one, but somehow I managed. I was curious to learn how this new version from Josef Prusa would do compared to what I was familiar with. I've done a short picture album of the process with some comments in them whenever something different or creative was done there. My first impressions are that this printer can work really fast and it seems very stable at high speeds. It feels much sturdier than the previous Prusa's and more stable than Printrbot. To its advantage has the reduced mass of the new compact extruder which I have not mas...

Driver update

Image
A few days ago I learned in the RepRap forum about a new stepper driver from Pololu using the DRV8825 from Texas Instruments. I have read good things about this family of drivers being more robust and higher current than Allegro A4988. Well, thanks to the kind offer from Pololu I've got a few units for testing (at a huge discount) and my first impression is pretty good. This may well be the answer to get a direct drive extruder that does not suck. I have detailed in past posts how I was unable to get a successful direct drive extruder working in my system, as I was needing more current that my electronics were capable of, for my extruder to work reliably at medium speeds. This new driver seems to be able to push 1.5A without the need of active cooling. The manufacturer claims that up to 2.5A per coil are possible with proper cooling. Next stop is to use them for powering a CNC machine with beefier nema23 motors.

Stellaris ARM Cortex-M4F kit

Image
When I saw this summer that Texas Instruments was giving away ($4.99 shipped is a steal) Stellaris boards sampling their Cortex M4 with floating point unit I thought I could not go wrong, as it was already cheaper than any other kit I have bought in my life. After a while I've received a big box at home, than contained a smaller box, that eventually had the small card and USB cable inside. The first impression was very good. But once I've got the board up and running I wanted to start making some sample programs for testing its capabilities. There is where I felt a bit dizzy. Texas lists a lot of tools to be used, some can be downloaded from their site, others are free versions of commercial products with a limited functionality. I guess  that these years using Arduino have spoiled me, as  I have been able to complete different projects without having to have a look at any AVR datasheet. Even worse, I get used to the idea I could be developing code in different platforms (...

The credit card trick

Image
I have just finished a ShapeOko but because I did some mods: I've got some leftovers: some MXL belting and two 5mm MXL pulleys. What best thing to do than to start a project so they get some use. So I planned on building a new Prusa i3 3D printer. Not that I need yet another printer but a new model to try it out. I built a Printrbot earlier this year to get a smaller model than the Prusa for home use. At the time the printer dimensions were not very clear and much guess work was done on my side. Besides, I used a direct drive that worked but I was never happy with. This time I am, again, doing some guess work for Prusa i3, like figuring out that z-axis rods are M5 threaded rods or taking the overall dimensions out of the DXF of the aluminium frame off the Prusa i3 github , while learning that some changes have been done and are not yet into the master branch. As I was planning on using MXL belts instead of what apparently it is used in Prusa i3, which my guess work sugge...

My ShapeOko experience

Image
I have been dealing with a large size CNC project for a while. I thought a smaller version come come in handy at home. So I decided it will be a gift for my wife. I bought a ShapeOko from Inventables (Chicago, IL) with the fear that customs might be expensive. I ordered just the metal kit which was a steal at $199. It is shame that I ended up paying $90 for customs. When I mentioned to Zack (from Inventables) he was shocked too. Anyway, for those of you that have never heard of ShapeOko let's say it is an open hardware project for a small CNC milling machine based on another open hardware project called Makerslide . The latter is a linear movement guide made of aluminium extrusion. I am almost done building the thing and it only took a few hours. The kit is well packaged and it is easy to build following the wiki instructions. However there are several improvements that I may already include in my build: dual Y-axis motors, nema23 motors for X and Y axis and an alternate r...

Circuit Cellar Interview

Image
Over the last seven years I have published six articles on different topics on Circuit Cellar magazine. It is the only magazine I keep on buying myself at home whatever that means. This summer I was approached by one of their editors about the possibility of running an interview. Being my first time, I wondered why other people might be interested on what I could say, I am not that interesting. But I thought it won't cause me any harm either (I honestly hope so) so I agreed. The process was quite painless and you can read an abridged version here . Given the fact that I have not thought I have accomplished anything specially great, I guess the only meaning of that is that I am growing older. On the other hand, there is some ego boosting associated with the episode I cannot deny either. If only my employer cared about it a bit ...

Kaspersky endpoint security 8 with Remote Desktop

Image
I've got a new computer in the office and it's a Windows 7 system (not my choice). I did all the required dance to enable Wake-On-Lan, both in the UEFI bios and on Windows but still my Remote Desktop did not happen. Nmap reported port 3389 was filtered but Windows Firewall was disabled. It turns out that Kaspersky Endpoint Security 8 (which was installed) does have its own Firewall, which was activated in my setup, and apparently does not care whether you activate Remote Desktop in Windows or not. You have to go to its management app: Configuration/Antivirus protection/Firewall and click the packet filtering rules to enable TCP port 3389. I wish they either warn you when they see Remote Desktop is activated and there is a rule preventing it to work or to just self-adjust to that change. But it is clear that Antivirus software real task is just make the life of Windows users miserable, isn't it?

Read from multiple input devices

Image
One of the cool features of USB is that using Human Interface Device (HID) you can get a new device to behave as, for example, a keyboard. You can do this now with a Teensy or an Arduino UNO (but not the FTDI-based older Arduino boards). The key is that by using the proper USB messages a device can talk to the system in a way that looks like a mouse, a keyboard, etc. The good thing about talking like a keyboard is that applications that expect a keyboard input may be fed directly with the data from that device. This many times the case with devices like a barcode reader, that can input the scanned code to the application software as if the user was typing that number on the corresponding box of the program, which is convenient just in case the code is unreadable for any reason by the reader but not by the user (or if the barcode scanner is broken or stolen). My current project required reading RFID codes and for that I already bought a RFID reader with I2C interface that could be...

Amazon: Yes, yes, yes!

Image
When one of my kids told me his Kindle had stopped working I thought it was his fault. On closer inspection I could not see any damage to the screen. None of the suggestions of the troubleshooting guide worked so things did not look good. After some reading on Amazon forums it was clear I was not alone and other customers had experience a similar problem that required a replacement of their unit. I was very happy to learn my unit was less than a year old, so I contacted customer service to see what to do next. I had bought the unit while being in the states but I was now living in Europe, so I was uncertain about my choices. Once I explained the problem I was having with the unit, to a very nice representative named Stacey, I was told unit had to be replaced. I was told a replacement unit has been sent to my address in Europe and paid with a gift voucher. I was told that using that same box I should return the defective unit once I've got the replacement. I was even provi...

Slicing and nesting working together

Image
The initial idea was to slice 3D models into a sequence of thin slices. Once that was working it was suggested that thicker slices may reduce the total machining time. The problem is that vertical cuts for the slices will create an ugly rendering of the desired surface that will later need to be fixed by an artist. The next idea was to put together the milling action for each slice sides and the nesting algorithm that will distribute the slices into the available stock sheets. As usual it is easier to say than to do, and though it seems Aspire and Rhinoceros allow you to do a similar process, my code is now performing both tasks without user intervention. Blue or green color on the outline represent whether the slice has to be flipped or not (each slice has to be machined from top to bottom).

Hello Java Topology Suite

Image
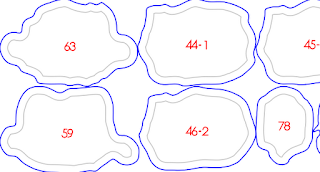
There is always a better way, in my case, the better way was to get rid of my crappy implementation and to let others do the work for polygon buffering. And trust me, I tried to patch my simple implementation and next I tried to use the better but still not error-proof JavaGeom one. I ended up using the fine implementation of Java Topology Suite, that worked like a charm (once I managed to understand the subtle details of how things work over there).  So now you can see how the gray color lines are an accurate offset of blue polygons in my software. It did not hurt that JTS is a pure-Java library, so my tool will be multi-platform the easy way. I learned along the process that though SWIG framework does include Java bindings for CGAL library, it does not provide full access to all library functions and, once again, polygon buffer seems to be one of the parts missing. Besides, CGAL install is platform specific (though CGAL is still a terrific library). Along the process I have l...