Posts

Raspberry Pi is teaching me new tricks
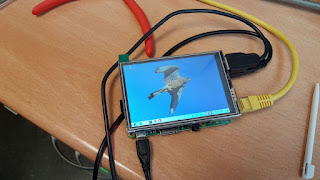
Image
For an upcoming Art project, I needed to make a few things using a Raspberry Pi 3. And while I have not yet figured out a neat way of setting the wifi configuration wirelessly (as they did for ESPlink ), I have made some progress on other fronts needed and configuration-related. First thing on the list was to make the RPi3 work with a 3.5" color LCD with touchscreen .  It was simple once I followed the right set of instructions .  Not sure if the display can be kept on while using the HDMI output but guessing no I removed the HDMI output for all my testing. This LCD display is 480x320 resolution and it can work as a minimum display for both text console and X11. You just do not want to browse the web with that. While the display worked nicely, I wanted it to be kept working all the time but the power saving settings disabled it after being idle for a while. A bit of googling led me to a nice solution: to add the line xserver-command=X -s 0 dpms to /etc/lightdm/lightdm.c...


Reading local files on HTML5

Image
I wanted to perform some calculations over STL files. I thought it would be nice to be able to do that within a modern browser so it would work on any computer without the need to install any binary. But I have never dealt before with reading local files using Javascript within an HTML page. I was sure it had to be a way as sites like gcode.ws   or chilipeppr.com  allow you to either select a local file to be analyzed or to just drag and drop it to be sent to a CNC machine. But my experience with Javascript is quite limited and I have never found myself at ease with that language (though it is mostly the mess of Javascript + HTML + server extensions + server database what makes usually programmer's life a living hell). But given it was a long time without venturing myself into the intricacies of the File API I decided I would learn a new trick. Most of the trouble is the asynchronous behavior of the system that took me a while to understand . In many languages,...

Spanish Stick Font for your project

Image
I have a project where I need to draw some text on a plotter and while I could just use a vectorized Truetype font, that usually comes with the undesired effect of doubling the printing time plus leaving a white background, as the font strokes are made of two different lines. A stick font consists of a single line. Just googling around I found this program . That happens to include a set of font files that were easy to parse (as they were text files).  This is the font I selected for my purposes: Originally it did not include the full set of Spanish characters but that was easy to fix , as you can already see them on the picture above. Plus I realized some of the existing characters could be optimized so drawing time could be reduced.  Maybe there is a better way as I have a very limited knowledge about font standards. But this approach makes sense to me. Now I just need to create a simple script to go from text to SVG or G-CODE.  Update : I ju...

Measuring weight with Arduino

Image
While there are different solutions to achieve weight measuring, it seems the cheapest and neatest way is to use the HX711 amplifier and A/D converter. Of course, a test weight is needed for you to be able to set the scale right. In my case that is going to be done by that idler that totals 11.30 grams. My sample load cell is a 100 grams unit so it is not that bad, but for a larger end scale, you want to have a test weight at least 10% of end of scale value. What HX711 does is two things, on one hand, it is a precision low-noise amplifier for the load cell signal and on the other hand, it performs a 24-bit analog to digital conversion (much higher resolution than the 10-bit resolution of the Arduino built-in analog inputs). Once data is converted to digital format, Arduino can read it from the HX711 using a two-wire serial interface. It basically streams the 24-bit value on one pin while the other provides the clock signal for the transfer. There are several Arduino librarie...

Of cars and goats

Image
Some days ago, while listening to an exam exercise, I learned about an old story that happened in the early nineties. It seems it stirred quite a controversy at the time. It was about a TV show where a contestant was offered to chose one door out of three to win a car. The setup was that only behind one of the doors a car was present while the two others contained a goat. Apparently, most people value the car as the good prize but could not care less about the goat, that was the losing item. The host would open a door different than the one the contestant chose to reveal, invariably a goat. And later the host will offer the contestant to switch to the other remaining door. The controversy was about what was the best choice the contestant could do: to switch or to keep the original choice. We all agree that, initially, the contestant has one of out of three chances to win the car. However, when the host opens one of the remaining (non chosen) doors showing a goat it is not so c...

Hello Clipper, bye JTS

Image
Polygon clipping and polygon offsetting are operations that due to the multitud of cases possible are quite a difficult beast to tame. That is why I have used an external library when I have needed such a feature in a program. A few days ago, researching for a student's assignment, I learned that " clipper " library had been migrated to Java  by Tobias Mahlmann.  I had a minor trouble with one file not using UTF-8 encoding but other than that it compiled and run beautifully (not in my large display though as I am using an scale factor larger than one that messes the Java GUI layout). Another interesting detail is that the code will need Java 1.8 to compile as it uses a Lambda function in one of the Comparators used. However, I wanted to use it with some older code that was using 1.6 and the compiler was not happy with my version request, so I needed to do a small change to get rid of the Lamba function code in favor of an inner class.  Once the code was worki...

OpenSCAD kept crashing on Ubuntu 16.04 with AMD drivers

Image
After the upgrade of my computer's graphics card for a new AMD RX 460 I noticed OpenSCAD program was crashing all the time with a segmentation fault (every time I pressed F5 or F6). But the problem would only happen if I was using AMD native driver (amdgpu-pro). I saw no references online to this specific problem which was weird. I decided to buy the RX 460 as it apparently had good Linux support, so it was odd to have this kind of problem but no matter what version of the driver I was using or what version of OpenSCAD nightly build I could not use the application. I managed to get an AppImage version that worked without a problem in my system and that is what I have been using for a while. Today, I have decided to check if somehow problem could he related to my locale, so I invoked the application like this:  LC_ALL=C openscad-nightly And lo and behold, OpenSCAD is working as it should, no problem whatsoever. So it is clear that my Spanish locale was what caused the probl...

Windows 10 on vmplayer

Image
From time to time there is some software I need to use that is only available for Windows. For that I kept an old virtual machine I created ten years ago that was running Windows XP and served me well over the years. But the last instance of software in point was the latest Netfabb  Standard 2017, that is only available as a 64bit Windows version. So I grabbed a Windows 10 ISO from Microsoft Imagine shop and fed it to my virtual machine. After some time I got a new virtual machine running Windows 10, or almost. I could see networking was not working nor was audio. I could see many people reporting different problems with various virtualisation tools and Windows 10 but it was not clear what my problem was, so after following several wrong paths I realized the system was complaining about not having a driver for the hardware found. I checked on the configuration file and I could see the network device was "vlance" and I replaced it for "e1000" and the latter was e...

Lots of changes at once and one OpenSCAD bump

Image
In order to get my new 4k display connected to my Linux box at work I had to replace the graphics card (actually I was replacing none but the motherboard's one). For the 3840x2160 resolution I selected a cheap ATI board that apparently had decent Linux support, the $100 board RX460. First problem was my computer did show nothing on the new screen, that was fixed connecting the old one and using the BIOS to switch default video to the new card. Then Ubuntu 14.04 would boot but failed to recognize the new card, which makes sense as the driver was not install. However I would get graphics working using the software rendered (frame buffer). When looking for the Linux drivers I realized I would need to upgrade to Ubuntu 16.04, something I wanted to do for a while but kept leaving for a rainy day. One colleague at work mentioned to me he have had quite a good experiencing upgrading a couple of systems from 14.04 to 16.04 so I was set to do it then, now that it was supposed to be easy...

Wifi watching

Image
Like train spotting, bird watching, I guess that wifi watching could become a thing, or so could be if you use this nice app for your Android phone. I avoid the term wardriving because it assumes you drive a vehicle and it has a dubious or evil aim (or may be that is only my interpretation). I was touched by the work of these artists that visited and gave a talk at our campus a year ago. So I just went out for running an errand and grabbed nearly 900 different SSIDs around the block. The Wifi Collector app will grab both access point information plus geographical location using the phone location services. Data can later be exported as a CSV file or KML file to be used with Google Earth as the image here shows. While I did not uncover any political message or funny stuff on the SSIDs names on the surroundings, I guess it can be another way of catching and reviewing your walks (runs?) around the city.  I will use this app more than once just for a new way of perceiving the ...

Spark on a Printrbot Simple Metal

Image
One dry winter day I noticed a spark jumped from my finger when toughing the metal plate of a Printrbot Simple metal printer. Next time I tried to use that printer the hot-end would ram into the print bed so I had to stop the printer immediately. I remembered the spark incident and I assumed damage was done due to that static discharge. On to find a solution. Printrbot forums showed several entries about damaged sensors and how to replace them. Others had to replace both the inductive proximity sensor plus the Printrboad control electronics too. But one thing I noticed is that my inductive sensor was apparently working, as the LED will lit when approaching a metal part to it. After testing with M119 command, I realized that as odd as it might seem, now my printer thought the signal on Z-MIN end-stop was reversed. So it was triggered when the LED was off and open when the LED was lit. That was pretty odd but as the sensor seemed to be working I set my path to modify the firmware confi...

More on STM32

Image
After testing different choices, I have come to test a package called Platformio that runs over Atom editor. Atom is a multiplatform code editor that looks a bit like Sublime but it is open source and they claim highly hackable. The nice thing about PlatformIO is that it looks like a nice IDE that can handle a good portion of embedded processors from Arduino variants, to ESP8266 and ESP-32 to many ARM variants from NXP, ST, Atmel, etc. For the f103c8t6 board I am using I can use the config details above in platformio.ini file in the project folder and it all works nicely on one of my Macs, the one using El Capitan. Unfortunately, my laptop is still running Mavericks and for that it seems there is not a libusb available that plays nicely with ST-Link programmer/debugger dongle. Now I am going to target my dcservo code for this Cortex M3 processor.

STM32 or the pain I have been avoiding for quite a while

Image
If you follow the blog you know I use Arduino IDE for quite a while and I am quite fond of the eco- system as it usually makes things simple. With some effort, same environment works for other beefier processors like ESP8266 or even STM32. But what usually kept me away from the various ARM offerings, with the exception of mbed on-line compiler for Nucleo boards has been the commitment level manufacturers seem to ask from engineers before they can start to think using their wonderful hardware. So far my point has been that life is to short to go through so many manuals and datasheets. Recently, an American maker told me he was about to build a piece of hardware using a STM23F103C8T6 core to mimic my dcservo project I built around Arduino and other processors (even around a Maple Mini with a similar STM32 processor in fact). He would welcome any help on the software side of things so I had to have a look at how I could help and ventured into the wild west of development tools for t...

Make a heated bed with 9 calibration points.

Image
Most likely you have learned that the new Prusa i3 from Prusa Research is including a nice self-calibration feature based on the special heated bed they use. That bed features a grid of nine disks that can be detected by an inductive sensor that moves with the hotend carriage. These spots double as bed leveling and XY geometry calibration. While the bed is flat an covered by a special (PEI) film to improve adhesion, the spots can be easily replicated if using an aluminium bed as my video below shows. Nine inserts of 8mm steel rod can be used by doing nine holes of the same diameter on the aluminium bed. The interesting feature is that steel is detected further away than the surrounding aluminium so the same algorithm should work if you build your bed like this. In fact you can just place the aluminium sheet on top of your existing heated bed (though doing so may increase bed weight needlessly). According to the calibration source code these are the locations of each poi...

Installing PIL on OSX

Image
I have got some messages about installing PIL library on a Mac assuming it is a Windows-only library. It is not. I have never used Python Image Library before, but when I designed 4xiDraw drawing machine I used one Inkscape plug-in that was intended for laser engraving. I hacked it just a bit to make it work with my machine. The plug-in itself is a simple two-file thing you need to copy to your ~/.config/Inkscape/extensions/ but the PIL library may be a bit of a challenge on some systems. It is important to use 0.91 version of Inkscape as the plugin will not work with an older version. Other than that it should work in Windows, OSX and Linux. What worked for me are the following commands on an opened terminal session: sudo easy_install pip sudo pip install pillow

Reaching your Pi over your network

Image
There are multiple ways of learning what is the IP address your Raspberry Pi is obtaining from a router. The most obvious one is to use the router's DHCP client list. Another one is to use a HDMI display as your RPi will report its IP address while booting. The former requires administrative access to the router, which may not be possible on certain networks and the latter is only possible if you can connect the display to the RPi and you have a display available. What I am going to propose requires no special rights over the network gear not any additional hardware. One of the things you can do over a network is to broadcast a message (in fact this is the foundation of the DHCP protocol for a computer to find a suitable DHCP sever over the network without previous knowledge of it). Sending a UDP broadcast message allows any other system on the network to hear it. And if that message is received each receiver knows immediately the sender's IP address. So here is what I...

First experience with RPi3

Image
I am working on a project that required some computing power and commanding an Arduino UNO running GRBL. Things have changed quite a bit from original plan, so because radio reception was awful, the original plan of using dump1090 with a USB dongle had to be ditched. Of course I only learned that once I have it working nicely on the Raspberry Pi 3. Plan B would be to use the Ethernet network interface. Once that was working we realized it was not possible on our target installation. Plan C was to use wifi. And while it is really simple to get it working with stock Jesse, I found a way to waste my time when I added spaces in between variables and equal signs in /etc/wpa_supplicant/wpa_supplicant.conf . So now you have been warned. # Include files from /etc/network/interfaces.d: source-directory /etc/network/interfaces.d auto lo iface lo inet loopback iface eth0 inet manual auto wlan0 allow-hotplug wlan0 iface wlan0 inet dhcp wpa-conf /etc/wpa_supplicant/wpa_supplicant....

My Printrbot experience

Image
While some friends were waiting for their first Printrbot off Kickstarter I had already built one with the parts Brook Drumm posted on Thingiverse. That was quite a while ago. It was a cute little machine that I sold to a fellow reprapper. Last year , while I was working on a closed-loop DC motor controller for replacing the steppers of our 3D printers, Brook Drumm offered to help and sent me a free Printrbot Simple Metal, fully assembled to be used as a testbed printer for such type of motion control. I had a difficult time trying to convince the taxman that the printer was really a gift and eventually I had to gave in and pay some custom taxes although that was not really a product I was buying and the sender was charging me no money for that. I was surprised of how compact the thing appeared and how smooth and solid all the axis moved. However, the 3d printer was not intended to be used as a 3d printer and the first thing I had to do was to partially disassemble a brand new unit...

Stepper-motor speed profile generation

Image
My 4xiDraw project has been a source of inspiration for other projects. A while ago I mentioned how to add wireless connectivity to a serial-based device, but for a subject I teach I wanted to get a bit deeper on the details about stepper motor timing generation for trapezoidal (or any other) speed profile. While this functionality is implemented in every CNC or 3D printer controller software, most of them are based on GRBL development, which is efficient but not easy to grasp on a first look. There are many different but related algorithms working together there. Just by chance I bought a Wemos D1 board that replaces the Arduino UNO Atmega 328 by an ESP8266 but keeps the UNO form factor. It was a weird proposal but I bought anyway as we all know that anything that stamps wifi on it makes it a better product. I have used the ESP8266 in the past, through the Arduino IDE, but I have never needed to achieve any realtime operation. But once I checked that CNCshield board could be ...

G-code over wifi

Image
In the past I tried a Bluetooth link for sending g-code wirelessly to a 3D printer. It works ok but it seems a bit slow so eventually small stops happen while printing (buffer empties). Wifi was an expensive option at the time so I forgot about it. Recently, the availability of the excellent ESP-link firmware together with NodeMCU/ESP12E boards for less than $5 painted a different scenario and while I was not on an immediate need of it I decided to give it a try during my summer holidays. That firmware could be used with smaller and cheaper ESP8266 boards but I have found much more convenient to use (as they include their own voltage regulator) the so-called Nodemcu, just $1 more or so. These boards pack a 32bit SoC with 4Mbytes of flash and, lately, they are even supported through the Arduino IDE. In order to keep the printer still usable through USB connected to a computer I patched Marlin so I could use an additional serial port for the wifi connection. The problem was that ...