Posts

Fan blades replacement

Image
I have two fans at home, one of them is quieter than the other. I assumed the reason was the shape and number of the blades, as the noisier one features a 3-blade rotor while the quieter one is a 5-blade one.  A good design exercise that might bring some real-life benefit if proved successful. So I went on and created a model using Onshape, that had to be able to be printed in the Prusa MINI. I designed two parts , the hub, and the blade, that will join with a dovetail.  While I did not do an exact copy of the quieter fan blades, I tried to stay as similar as possible. Which may not be good enough for the best results. It was also a project to explore the viability of the 3D printed approach. So this is what I designed:  To my amazement, 3D printing the blades really favored printing them all together, as the print time of each layer was so small if printing just one that the print needed to be slowed down. So printing five blades did only required around 3 times the prin...

First steps with a Duet 2 Wifi

Image
I have been testing a Duet 2 Wifi board lately. It is the first 3D printer / CNC controller board that I use that has a decent wireless upload speed. It is a well-thought-out board designed by David Crocker and Tony Lock, that features both an ARM ATSAM4E8E and ESP8266 module. The former handles the RepRapFirmware and the latter provides wireless connectivity to the mix.  The board features five silent stepper motor drivers and heaters and fan controllers to be used on 3D printers or CNC machines. The built-in socket for an SD card allows its usage not only to hold the firmware and website files but also user folders containing g-code files that can be uploaded and managed remotely through the built-in web server.  The only main problem for the newbie is SD card and board initialization, which should have been taken care of by the seller unless they are lousy. But the board I got did have an empty SD and no manual so I had to go Duet3.com site to get some answers in their Doc...

Remote shutdown your Python program

Image
One piece of code for a project is written in Python and it does what it was intended to do but, out of the blue, I am asked about the possibility of shutting it down remotely from another computer (code is running on a server where I do not want other users to be messing around). It was a perfect opportunity for using the threading library. So I went ahead and I wrote a small piece of code, encapsulated in a function, that will be run on a different thread. The main program is still doing its thing, but the new thread now creates a network socket and binds it to the proper IP address and port so it can accept connections from other computers over the network. When a new connection is made, the code will check if a special token is received, and if that is confirmed, it will shut down the whole program. Otherwise, the thread will loop forever in case new connections are made in the future. So the question is how to shut down the program. Usually, I use exit(0) to make my program ...

Uploading code wirelessly to Arduino Mega

Image
Given the same thing worked ok using an Arduino UNO form-factor board with both an AVR 328p and an ESP8266, I was expecting not much trouble getting the same thing to work for a similar board in the Arduino Mega format. Oh boy, I was wrong! The hardware modification part was easy: Find the diode whose cathode is connected to the RESET pin and remove it from the board. ( Board schematic ) I used GPIO12 as the ESP8266 pin to be used to reset the AVR processor (key for a remote upload). But once the hardware was working, it became obvious the software side of things was just not working. I could see no communication was ever successful between the ATMega2560 and avrdude program. Reset generation was not a problem as it was clear remote reset was working ok. Perhaps timing? Let us read about possible issues on github. It turns out this is old news, as ESP-Link is playing a trick to detect the attempt of a firmware upload so it can reset the AVR chip then. That detection was...

Uploading code to your Arduino board remotely

Image
A while ago I bought some Arduino UNO and Mega cards that featured, besides the usual processor, an on-board ESP8266 processor to bring Wi-Fi connectivity to them. These boards , have DIP switches to be able to program either the AVR (Arduino) processor or the ESP8266 using the USB port (think of them as a sort of serial port multiplexer). The main use for me was to be able to use them for different applications without using a USB cable. A [Wi-Fi]  TCP connection to port 23 would be used instead. As I am using ESP-Link firmware for the ESP8266. Do you want to print wirelessly on your 3D printer? You can do that with one of these Arduino Mega boards that can use Marlin. Using Pronterface software you can print to a TCP socket the same as if you print to a serial port. However, what intrigued me is that no mention was made in the boards I use about using the ESP8266 to upload new programs to the Arduino processor. And that was odd as ESP-Link software allows you to do that. H...

Plot real-time data with Python

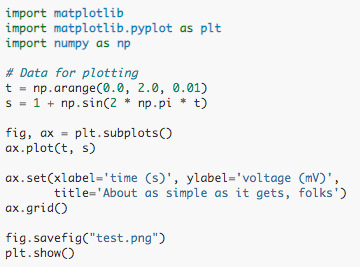
Image
I am involved in a project to create a tensile tester for a friend. I have never used a tensile tester myself so I have to play by ear here. But it occurred to me that not much more than a strong 1-dimensional axis would be needed. So we built a mock-up using a stepper motor, some old guides from a sliding door and threaded rod connected to both the motor shaft and a nut that was soldered to the moving carriage. The second part of the contraption was to set a load cell on one end so a test piece could be fixed between the load cell and the moving carriage. As the carriage pulls away from the load cell, the specimen response could be measured and graphed. Using an Arduino was the obvious choice this time, as it was, in fact, the only choice, given my friend is building this thing at home, three thousand miles away from me and we all are under covid19 lockdown. He only had one Arduino Mega at home, so that is what we will use. I thought that specimen test data could just be sent to...

First impressions on Prusa MINI

Image
Although I bought the unit back in October 2019, it seems I was not the only one, so it has been a while until I have received my unit, but just last week, during the lockdown, I was pleased my new printer arrived. The main goal was for this printer to be a tiny 3D printer to have on my desk at home. I have been very pleased with Prusa's MK3 printer that provided me with reliable prints every time I need it. I just thought a smaller printer would be ok at home, as most of the time I do not need the extra volume the MK3 can do. Building the Prusa MINI was quite straightforward and it took me less than one hour. I guess it can be done much faster once you are familiar with the model. The new LCD graphic color display is one step forward from the older LCD used in the MK3. It is kind of small so I did not miss it was not touch-sensitive. Once it was built and working, I checked the firmware version and it was, indeed, running the latest version.  So the next step was to prin...

Improving your streaming game

Image
After my first on-line lecture I have got some interesting feedback from my students and from my own experience too. While it felt odd during the first few minutes, the fact I saw many of my students were there and that setup mostly worked made me relax a bit more during the second half of the class. But, first of all, let me tell you what worked well and what did not: Asking the students to post a comment for attendance record worked extremely well in my opinion. As it allowed me to put faces to the online viewers counter, while it also reassured me my students were ready, which also relaxed me as I was worried they might not show up. Comments allowed students to report audio trouble when it happened and me fixing it quickly.  Of course, comments also allowed students to raise questions about the topics I was talking about, which make the lecture a bit more interactive and, hopefully, useful and entertaining. I found myself at times uneasy as I have not a pointer to signal...

Youtube streaming for dummies (and for me too)

Image
The coronavirus crisis forced us all to stay home. Those of us in the education business are instructed to keep going using online resources. But given the current state of laws, I am reluctant to distribute any personal information (and that includes emails) to any available webinar platform. Several of them have been suggested like GoToMeeting or Zoom by my friends. We have Microsoft's Teams on-campus package but, for some reason not all my students are on the platform. So it appears the simplest thing to do is to just use youtube streaming service, that allows hidden videos/streams, only accessible to those who know the URL. And I could email the stream info to my students by email without revealing their email information to anyone. So that sounds like a plan but ... there are a few caveats: While I do know how to stream a video out of a webcam (as simple as pressing the upload button and choosing "Go live"), just the idea of a talking head does not seem very a...

The interesting world of VAWTs

Image
I was curious about the type of wind turbines that do not need to face into the wind. So I googled around to learn they are called Vertical Axis Wind Turbines (or VAWTs). But that is not all there is to it. There are a handful of different designs built around two basic concepts: drag and lift. And as you can guess, these are not as efficient as the more popular Horizontal Axis Wind Turbines (HAWTs) found on most wind farms. The beauty of the VAWT is their simplicity: Just a special shape the wind will rotate and, if connected to a generator, it could be used to produce energy too. But its power-generation capability is somehow smaller (if you consider the frontal area it presents to the wind) than the propeller rotors of the HAWTs. On the other hand, some of the designs, have been created quite simple so they can be built repurposing other objects. For example, the basic Savonius rotor can be built by joining two halves of an oil barrel in an S-shape configuration. Any other c...

Spot welder

Image
Over the years I have seen a few ways of doing spot welder for battery packs: A bank of electrolytic capacitors One or more super-capacitors A modified microwave oven transformer A car or motorbike or LiPo battery But besides the power source, some sort of control is needed, as you are basically shorting the output of your power source and you do not want that to last long. The simplest thing to do is to use a pushbutton, but that is not very precise nor repeatable, so something like an electronic timer can work best. But if you want to provide more than a single pulse a microcontroller can be the best choice for a precise and repeatable switching of the power. And switching the power can be another source of trouble, especially if the switch is the high-current side. A spot welder can rush hundreds of Amperes and you need something more than a pushbutton to handle that. Some designs use a bank of MOSFET transistors to do the job (power dissipation is not huge due to th...

Just add a shutdown button, it will be easy, they said ...

Image
Finally, one of our Art projects is selling. My partner asked me to add a power-down button so the museum personnel has an easy way to power off the installation. Adding that to a Raspberry Pi cannot be very difficult using one of the GPIO pins or so I thought. So the first iteration was something like this: a small Python program that will detect a falling edge on an input GPIO input. Tests worked ok, I was using the internal pull-up resistor and a normally-open switch would connect the input to ground. Once the falling edge was detected a detailed shutdown sequence would be initiated (to avoid any damage a heated element would need to be retracted by a servo). As usual, things worked well in theory and in the lab, but failed miserably in the real test. So I thought that, perhaps, the wiring was too long and close to a power line and that might be picking up some noise, that eventually triggered an unwanted shutdown (sometimes even before the system started working ;-) So the...

Testing SKR 1.3 board with Marlin 2.0.x

Image
Not that I really need it but given the price I had to buy one of these units just to get a feel of it. At less than $20 it was a steal. And most of what I have seen from the board is to be liked. But, as usual, it took me a large amount of time to get everything working, as a few hurdles prevented me to succeed on the first try. Luckily, there is a huge Marlin community and getting the software up and running was easy-peasy, once you have Atom/PlaftormIO installed (which I did). So the basic configuration is well covered on the net. The board can be powered either from the DC input (12/24V) or from the USB (jumper-selectable).  But ... expect trouble if you are powering it from USB and attempt to configure TMC2208 UART mode. It will not work until you power the board with DC too. And it will only work if you have properly configured your firmware and set the right driver solder blob so UART is connected to pin number 4 of the driver carrier board and you have set the pro...

The art of compiling Meshlab and getting it running

I have been using Meshlab for quite a while as a powerful tool for automating 3D mesh calculations. Newer versions were not always more reliable than older ones, but mine was mostly a command-line usage more than interactive sessions so I got by. The latest stable release is still 2016.12 and it gets my work done (though some changes were made to the command-line switches that broke some of my scripts). I have been using it on 14.04, 16.04 Ubuntu systems and lately, I wanted to use it on the 18.04 Ubuntu. But for that version, I could not find a pre-compiled binary and the versión included with the distribution was Meshlab 1.3.3 that, you guessed it, uses a different set of command-line switches so it was not an option. Still, there was the choice to install a binary using the snap package system, which comes included in Ubuntu 18.04 and got me a working interactive Meshlab. But the meshlabserver command was nowhere to be found. It seems someone thought it best to rename it to me...

More on wireless uploading

Image
As usual, even best-laid plans face hardship, so now I can wireless upload g-code files to the USB memory connected to a DDCSV1.1 CNC controller. But, once I factor in not to upload a code line before I have got the remote echo of it, things get really slow. Like ten minutes per megabyte. Yes, I wanted it to be wireless. I could accept a not so fast upload speed, but 13 Kbps is not ok as we handle files in the 1-10 MByte range usually. A few seconds is ok, but half an hour or more is not. So I came up with yet another approach that would recycle some old-tech that I discarded years ago: There was a USB dongle that would accept an SD card and it would work as a USB pen driver but with a twist: the unit did also have wifi connectivity. So the users could access the content of the SD card wirelessly as a network disk. That was cool and made totally unnecessary (apparently) my previous work but, there was a catch: The device would work either as a pen drive (as soon as you connect it ...