Posts

Teaching Rambo how to print

Image
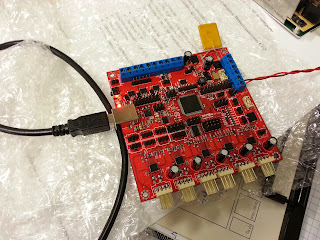
I could not resist the temptation and I bought a discounted RAMBo board a while ago. Today each attempt to upload some code ended up in a list of messages like the ones below: avrdude: stk500v2_ReceiveMessage(): timeout avrdude: stk500v2_getsync(): timeout communicating with programmer First idea was that the board might not contain a bootloader, but after using my recently acquired ICSP programmer and obtaining a dump of the ATMega 2560 from the board I could see it was exactly the same as the one from a regular Arduino Mega board.  As it is a new board, there is a chance of being a DOA. But I was surprised that no LED was lit when I connected the USB port. However, I could see one of the LEDs from the serial port (I guessed this is what they were) blinking when I was trying (unsuccessfully) to upload a sketch to the board. I realize that while I dumped the flash memory of the Mega, more LEDs were lit. It then hit me that maybe the only problem was that the board (the v...

My printer port is gone!

Image
After the last change of computer I was asked for help to installed the bootloader on an ATMega 1284P processor for controlling a 3D printer. I have been using for years the Arduino Parallel Port Programmer with great success (it worked every time if I remembered to power the board through USB at the same time). But it turns out my new desktop computer does no longer has a parallel port. Not a big deal as all my printing happens through the network, but it was a no go for any type of other fancy uses of the parallel port (no, I do not have a CNC machine controlled with EMC2, though I have EMC2 software installed in my computer). So I finally gave in and ordered a USBASP programmer that was less than 5€ off eBay and fixes the need for a tool for uploading bootloaders to new boards. It comes with a 10 to 6pin adapter too, which was needed for Arduino boards ISP connection. You can use it from the command line with avrdude program or from Arduino environment selecting USBASP as the...

System upgrade "cloud style"

Image
I have got a new computer for my office. The old system was still up and running and so I was a bit reluctant to replace it, but I finally bite the bullet as I could say no to a free new system. I was running Ubuntu 10.04 LTS 64 bit meaning that no major upgrade happened in the last three years to my system. Over time your system also gathers lots of drivers, small utilities and fixes that you only discover you had them once you've migrated to a new one. So last week I used some time to install Ubuntu 12.04 LTS on the new computer, just to discover it won't wake up from suspend properly. The problem was the graphics card driver (an Intel graphics card in the motherboard chipset). But the only way to get the system back to work (without logging in from another computer) was to reset it. When I asked for help to another colleague he mention he had no trouble at all with a similar system. It turned out he was using Ubuntu 13.04 instead. So after almost a week of small installs I...

Building a mini i3 LC

Image
The first Prusa i3 I built used a 6mm-thick acrylic frame. It worked ok, but when I saw sgraber's design  I thought it will add a lot of rigidity to the acrylic frame. I later bought an aluminium frame and I forgot about the matter. Recently I came across a local business laser cutting acrylic and I decided to give it a go with a similar but smaller design. One of the things I have observed about 3D printers is that they tend to be big. Having a large surface for the print area is nice because you can print big parts, but you pay the price of the printer being bulky. As many of the things I print at home are small parts, I thought I would be a good idea to have a small printer at home and keep the larger ones for larger printers I might have at my office. Of course it is still to be seen whether things will work out this way or not. So I ended up building this smaller sibling of my home Prusa i3. These are the sizes of the rods I have used:  X-axis: 2x265mm smo...

Flipping a vector drawing in Java

An ongoing project required some 2D vector paths to be mirrored. I was programming in Java and using Area object to represent these paths. Though the obvious thing was to do this myself, I turned to the libraries for help.  I have not used AffineTransform before, but it seemed the right tool for the job. Unfortunately, either my understanding is shrinking (which may well be the case) or the existing documentation is not good enough. After trying several matrices from different posts online I realized I was not getting any closer to a good solution. The main problem is that while you can mirror an Area object with just one matrix (-1,0,0,1,0,0) you can't avoid the translation that will happen at the same time. The solution to my problem ended up being quite simple (I wanted to mirror the image in the X axis). // object a is the area I want to flip AffineTransform at = new AffineTransform(); at.scale(-1,1); Rectangle r = a.getBounds(); at.translate(-( r.width + 2 * r.x ), 0.0);...

Suspended G+ account for no reason?

Image
I woke up this morning to a frozen G+ account. I was warned my account was blocked due to infringing user policies and that I was no longer able to post until fate was determined. I was offered all sorts of informative pages about what those policies are about but none about what I might be doing wrong. It was vaguely said that I was spamming. Not owning a business to advertise and not knowingly advertising other businesses, beyond the casual comment of that shop seems to have good prices to friends, I was puzzled. Whether the issue was triggered by a user complain or a bot detecting some offending content, I was not told. I was just told that some content was against Google+ policies but not flagging which that content was I was left to my own devices, in the dark. It is as if the police will arrest you saying that you know why we do this without explaining further. Being convinced that this was a mistake and that I was not, knowingly, spamming anyone (in fact I hate spam), I...

What worked and what didn't.

Image
I know I have been not posting anything for a long time but the workshop preparation first and the fact that we scheduled a second edition just finishing the first one prevented me to do much besides that and my daily work. Certain things did not work quite right in the 3D printing workshop, like having to solder motor wires. Most people are not familiar with soldering and a soldering iron is a risk too. I ended up doing half of the soldering as another workshop attendant helped me out. On top of that, three printers have trouble with RAMPS cards, two of them with a non working motor and a third one with hotend thermistor input. Luckily all these failures were tracked down to soldering shorts that were easy to fix once diagnosed. Even better was the fact that nothing broke in the process. However, I failed miserably to stick to my own schedule and the software part of the workshop was much smaller that I have planned and wanted to cover. I felt a bit like a firefighter trying t...

There is always a catch

Image
After building several RepRap 3D printers and getting involved in several user forums about the matter I realized I was helping out other people building the same stuff I did a while ago and having a good time too. One of the good things about Open Source Hardware is that designers encourage people to build their designs whether they buy anything from them or not. I am helping out the people who try to make FabLab Valencia a success and a workshop for building 3d printers seemed like a good fit. I have never done an activity like this before and the logistics seemed like a nightmare that rather was other people's problem. So the plan was: I do the teaching at the workshop and we use some ready made kit for building Prusa i3 models. Just to be sure [I do not want to disappoint dudes that are shelling out almost $1,000] I decided to do a test run with one unit of the kit we have selected from a local manufacturer. That business was so brand new that ours was one of the first ...

LEDs getting smarter

Image
Sometime ago, I used for a project a set of RGB LEDs that were networked and responded to a few commands sent through a shared bus. It was a lot of work but it was fun. A while ago, at a RepRap meeting, user fungus showed me how he was using new controllers for doing exactly that, controlling RGB leds through a shared bus (daisy-chain would be the exact term though). They are available either as a small PCB with the chip so you can solder your own LED, or with a built-in LED or in a long stripe of LEDs. Other manufacturers just included the chip together with their RGB leds, so you can get a three pin RGB led that includes internal memory to be set at any desired color from a single-pin output of your favorite micro-controller. And my favorite during the last few years has been Arduino so I just downloaded the FastSPI library and try to make sense of it. Unfortunately it never is so easy, so this time I was forced to upgrade my Arduino to 1.0.4 (I was avoiding that and k...

Running in circles with the extruders

Image
While my Wade-type extruder works nicely in my old Prusa, I planned to use a smaller geared stepper motor for my new Prusa i3 3D printer. But the road to a reliable extruder that is lighter and smaller is paved with many different trouble. The first problem was to source PG35L-048 motors that Josef Prusa was using for his compact extruder and shown in different youtube videos. Sourcing it in Europe was not easy but I was lucky buying some units from an Austrian supplier called Neuhold Elektronik. But my joy was brief, once I could not easily extract the gear of the motor and I ended up sawing it off, because the shaft of my motor was shorter than the version used by Prusa, so I had to adapt the 3D design of the extruder to fit my motor. I got that extruder eventually working, but in order to get consistent extrusion the motor needed a bit more current than its specs so it was overheating. An aluminium piece, part of a heat-sink of an Intel processor took care of the extra heat. Still...

Heated bed blues

Image
Reprap 3D printers can benefit of having a heated bed because that helps preventing part's warping. When a part is printed, it is done depositing layer after layer of fused plastic filament. Either PLA or ABS, these fused filaments will experience some contraction when the melted filament solidifies and cools down. This effect will be more dramatic the faster it happens. And the end result is that some of your printed parts will have a round bottom instead of a flat one. And that is if you are lucky, as some parts will completely detach from the print bed mid print and they will be totally ruined. So we use a heated bed so the print bed is kept at a relatively high temperature. This way the filament will cool down not so fast and hopefully the parts will stay well grabbed to the print bed even in the corners. There are several ways of creating a heated bed: a printed circuit board with a long copper track zig-zagging the surface that will create a resistor. An aluminium p...

Getting back to SQL magic

Recently I was asked for a way of numbering a subset of records of database table. It could be done using a programming language, as I did with a small code in Visual Basic for Applications using MS Access connected through ODBC to the database server. But I wanted the real deal, so several ideas came to my mind. The first one was to transfer the desired rows to a temporary table, while deleting them from the original one to later create a new column of type serial that will handle the numbering. However, this idea was not possible as different set of rows required to have their own counter. Let's say that different cities required to have their sales numbered using independent counters. The solution I used was to create a temporary sequence value, to then update the table for each city value. Something like this in Postgresql: ALTER TABLE sales ADD COLUMN number; CREATE TEMP SEQUENCE counter; UPDATE TABLE sales set number=n FROM (SELECT nextval('counter') AS n, ord...

Tuning extrusion values

Image
After building the acrylic Prusa i3 3D printer is when the challenge began. I tried to get proper values for the compact extruder using a PG35L geared stepper motor and that proved to be quite a challenge. The problem was two-fold: on one hand, this is a small low-power stepper, that thanks to a 1:35 gear reduction it can achieve 0.45Nm of torque, but this motor is rated at 12V/180mA, which make it not ideal for our 12V drive voltage. But the motor needs a bit more current to create a bit more torque to obtain a consistent extrusion. The second problem is that due to the gear the motor skips if speed is too high. So retraction speed has to be dialed down to 7-10 mm/sec. Being the motor that slow is giving me more trouble, as retraction takes a while and I am getting some ugly plastic blobs in some corners. This time my troubles were deepened because I am using a [for me] new hotend I bought from one of my students, who bought a couple of them off eBay and only needed one....

A tablet that does it

Image
I have blogged in the past on how to use iPad for viewing electronic magazines and how it failed to me with some PDF files. I have recently got a Samsung's Note 10.1 tablet and I can certainly call it a success in terms of both PDF browsing and ebook reading. Everyone I have shown how to scribble on a PDF article was amazed. Yes, this unit comes with a stylus and it is a pressure sensitive one. Adobe reader works nicely and it does not crash. My benchmark is Circuit Cellar PDF that use to crash on the iPad (I do have an iPad1). This together with Cool Reader free app make the unit a very useful book reading plataform as it supports the common formats FB2, EPUB and MOBI plus CHM as a nice addition. The picture shows a screen capture at the original size, which is easy to read without zooming in.

On extrusions speeds

Image
I have been losing a fight with my latest extuder/hotend combination. It works ok as far as I do not want it to work too fast. I want to keep the PG35L motor not too hot or it will break. So I am powering at 500mA, which seems to be well beyond its maximum rated current, so it gets hot. But I've added a passive cooler to it so won't get dangerously hot. Should I used a higher current, as someone suggested, maybe my mileage might vary, but at the expense of needing a fan blowing directly to keep the motor from frying itself. One of the things that was bothering me was the maximum printing speed I could use with this new setup on my Prusa i3. Extrusion speed on Pronterface software (the host I use) is user selectable but measured in millimeters per minute, while travel speed is usually configured in the slicing software in millimeters per second. But doing the apparently simple math of dividing by 60 will not help here, among other things because the extrusion speed is the 3m...

Building a Prusa i3

I am very happy with the Prusa I built, and so I am with the Printrbot, which much smaller but it does a nice job too. In fact, most of the parts (on different shades of blue) of my new Prusa i3 have been printed with the Printrbot, but the black ones, which are ABS parts, have been printed with my Prusa. Having two working 3D printers seems to leave you in a difficult position to explain your wife why in hell you're building yet another one, but somehow I managed. I was curious to learn how this new version from Josef Prusa would do compared to what I was familiar with. I've done a short picture album of the process with some comments in them whenever something different or creative was done there. My first impressions are that this printer can work really fast and it seems very stable at high speeds. It feels much sturdier than the previous Prusa's and more stable than Printrbot. To its advantage has the reduced mass of the new compact extruder which I have not mas...

Driver update

Image
A few days ago I learned in the RepRap forum about a new stepper driver from Pololu using the DRV8825 from Texas Instruments. I have read good things about this family of drivers being more robust and higher current than Allegro A4988. Well, thanks to the kind offer from Pololu I've got a few units for testing (at a huge discount) and my first impression is pretty good. This may well be the answer to get a direct drive extruder that does not suck. I have detailed in past posts how I was unable to get a successful direct drive extruder working in my system, as I was needing more current that my electronics were capable of, for my extruder to work reliably at medium speeds. This new driver seems to be able to push 1.5A without the need of active cooling. The manufacturer claims that up to 2.5A per coil are possible with proper cooling. Next stop is to use them for powering a CNC machine with beefier nema23 motors.

Stellaris ARM Cortex-M4F kit

Image
When I saw this summer that Texas Instruments was giving away ($4.99 shipped is a steal) Stellaris boards sampling their Cortex M4 with floating point unit I thought I could not go wrong, as it was already cheaper than any other kit I have bought in my life. After a while I've received a big box at home, than contained a smaller box, that eventually had the small card and USB cable inside. The first impression was very good. But once I've got the board up and running I wanted to start making some sample programs for testing its capabilities. There is where I felt a bit dizzy. Texas lists a lot of tools to be used, some can be downloaded from their site, others are free versions of commercial products with a limited functionality. I guess  that these years using Arduino have spoiled me, as  I have been able to complete different projects without having to have a look at any AVR datasheet. Even worse, I get used to the idea I could be developing code in different platforms (...

The credit card trick

Image
I have just finished a ShapeOko but because I did some mods: I've got some leftovers: some MXL belting and two 5mm MXL pulleys. What best thing to do than to start a project so they get some use. So I planned on building a new Prusa i3 3D printer. Not that I need yet another printer but a new model to try it out. I built a Printrbot earlier this year to get a smaller model than the Prusa for home use. At the time the printer dimensions were not very clear and much guess work was done on my side. Besides, I used a direct drive that worked but I was never happy with. This time I am, again, doing some guess work for Prusa i3, like figuring out that z-axis rods are M5 threaded rods or taking the overall dimensions out of the DXF of the aluminium frame off the Prusa i3 github , while learning that some changes have been done and are not yet into the master branch. As I was planning on using MXL belts instead of what apparently it is used in Prusa i3, which my guess work sugge...

My ShapeOko experience

Image
I have been dealing with a large size CNC project for a while. I thought a smaller version come come in handy at home. So I decided it will be a gift for my wife. I bought a ShapeOko from Inventables (Chicago, IL) with the fear that customs might be expensive. I ordered just the metal kit which was a steal at $199. It is shame that I ended up paying $90 for customs. When I mentioned to Zack (from Inventables) he was shocked too. Anyway, for those of you that have never heard of ShapeOko let's say it is an open hardware project for a small CNC milling machine based on another open hardware project called Makerslide . The latter is a linear movement guide made of aluminium extrusion. I am almost done building the thing and it only took a few hours. The kit is well packaged and it is easy to build following the wiki instructions. However there are several improvements that I may already include in my build: dual Y-axis motors, nema23 motors for X and Y axis and an alternate r...