Remote development of a hardware device
I am familiar with helping other people remotely using tools like TeamViewer. Many times it has to do with a friend having trouble with her computer, operating system, or software.
But quite recently, I took care of the development of a complete machine without ever touching it even once. The project was part of a friend's Ph.D. work about the proper tensioning of old paintings. He asked me for help with a specific need in mind. He needed a machine that could push a probe against a canvas surface while monitoring the back force generated.
As usual, there were a few more constraints, like it was needed to be used in a few weeks as an appointment was already made with an important European museum. And all the parts needed have to be available online to get quickly to my friend's residence in Rome. Fortunately, my friend can solder and wire or build a contraption, though he cannot code. So the plan was to make this happen by shipping all the parts to his apartment and he will do all the mechanical design and build while I do work on the software side of things.
We have worked like this before on another project but now the time constraint was very significant so we would settle on things we have used before successfully. The hardware of the pusher will be built around the Openbuilds C-shape extrusion as a linear guide system. A threaded rod will push a moving carriage along the linear rail, a load cell will be used to measure the back force from the canvas, and a stepper motor will provide the power for the controlled motion of the pusher.
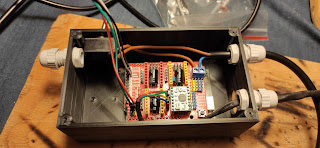
An Arduino UNO board will be used to control the machine. It was unclear what the maximum pushing force would be, so it was initially unclear whether a powerful driver will be needed for the stepper or if we could get away using a popular, cheaper, and smaller StepStick board. After some real-world testing involving a kitchen scale as an improvised instrument to measure force, it was determined the required maximum force could be achieved with just 1A on the stepper coils, so we would settle using a CNC Shield board on top of the Arduino equipped with one StepStick board.
With that out of the way, the software was split into two independent parts. The first one was a basic command interpreter on the Arduino that would accept a few simple commands over the [USB] serial interface and it will dump the data back to a controlling computer where it could be stored in data files.
I could develop the software on my computer but I did not have the real hardware to test it with, so for testing, I would ask my friend to connect the system to his computer and I will use it remotely with TeamViewer.
Once that was working ok, the next step was to develop the PC software. This time I was using a Windows computer at home but my friend just bought a new M1-based MacBook Air laptop. I discovered that the Arduino toolchain (and TeamViewer software) worked just fine on it so this was a good start. But I had to develop the software in something he could use. In a previous project, I was developing in a Mac and he had a Windows laptop, and for the development, I used Python and PySimpleGUI for the user interface, which worked ok. So why not repeat with these.
The PC program had to connect to the Arduino serial and send a few commands to start each test while storing all the received data on a file for further analysis. I could develop the program at home and have a couple of test sessions remotely too.
There were a few quirks, like the addition of an encoder to make it possible for the system to be moved by hand instead of using the stepper, but after two faulty encoders from Amazon (that provided no pulses on their outputs to the Arduino), we had to ditch that feature from the final product.
Now that the product is being used successfully, I am glad we managed to get it done during the Christmas holidays with a partial lockdown. And I can say I did not touch any of the components of this machine I developed jointly with my friend.


Comments