Posts

What is IDEX 3D printing all about?
Image
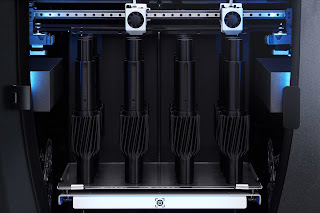
  While single extruder performance with BCN3D Epsilon W50 was not fast (around 20% slower than a Prusa MK3) its printing volume is significantly larger. So we put that to some u se, packing several large parts into the print bed.  If some of these parts are similar (either equal or mirrored) the use of IDEX can help here. So what is IDEX? IDEX is the acronym of independent dual extruders, which may not explain much yet.  These are 3d printers that have two print heads instead of one. Each one of these two print heads has its own extruder that can be operated independently from the other. This is quite a different thing than these other printers that can handle different filaments in the sense that here two extruders can operate at the same time, so two hotends can be pushing plastic onto the bed to create two different parts. Not very different as if you were able to write or draw with a pen on each one of your hands, but with a little catch here: although we can draw t...

When epsilon is actually quite large ...

Image
Before the summer holidays, we were approached by a Spanish company ( Sicnova )  that wanted to help us with our research project about modular 3D printed beams . So after some talks, we borrowed a brand new BCN3D Epsilon W50 3D printer.  Contrary to other printers and similar to an industrial robot, the machine was delivered over a wooden pallet that needed a manual forklift to move it to our lab. Overall volume was not very different from a washing machine or dishwasher. I went to the lab for unpacking it but returned empty-handed: the instructions called for two people for the unboxing procedure. So I had to return the next day with a colleague so we could remove the packaging and rise the printer to the workbench where it will live. Once the printer was powered on, we noticed the nice touch-sensitive display on the bottom-right corner, that greeted us and guide us through the setup procedure.  The printer has a USB, Ethernet, and WiFi connectivity, but we were not pr...

What happened to Meshlabserver?

Image
A few days ago, one reader comment on the blog (thank you Lance) made me aware of the changes happening with the Meshlabserver program. I misread the comment first as if the MeshLab project was discontinued, and after checking I replied back that a new released was just a few days old. But then it hit me, Lance was spot on,  MeshLab  project was deprecating the Meshlabserver program, now becoming "unsupported" and users were diverted to a new program called  PyMeshLab  which, as you all can guess, is now Python-based.   So that was interesting news for me as I have been using meshlabserver for various automation processes dealing with 3D meshes. And the even better news is that now installing it should be quite simple, just type pip3 install pymeshlab.  Linux and OSX install was uneventful and it all worked as expected. I learned that you could even use .mlx files created with Meshlab software. Windows 10 install was equally simple but, once I imported...

Upgrading from Prusa SL1 to SL1S

Image
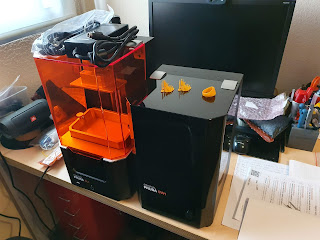
 A while ago I bought a Prusa SL1 resin printer with a washing and curing unit called CW1, both from Prusa Research. They came as a bundle and while the price was significantly higher than existing cheap SLA printers from China, I bit the bullet and went ahead with a more expensive set that I thought it will be worth it.  The printer I bought was a kit to be assembled and from the very beginning, I could see there were a lot of quality components and advanced features. All in all, I have used the printer only a fraction of what I use my FDM printers. The main reason being the messy process associated with resin, even if you have a cleaning and curing unit (that helps on that front). The smell of the resin is yet another detail I do not like, though it is not much worse than printing ABS. But recently I had the opportunity to install an upgrade to my SL1 printer. I have heard of different manufacturers replacing color LCD screens with monochrome ones, that while maybe more expe...

Garbled OLED display

I was testing the SD1306 MicroPython library for a small OLED display I just received. It uses the I2C bus and it is 128x64 pixels monochrome. I have used a smaller one before with that library and it seemed a no-brainer.   Unfortunately, I was not sure the unit was operational as it was brand-new and could be defective. I could only see the text I sent to the display for an instant and then only a fixed garbled background that was impossible to remove. I searched away until I found a Reddit post that summarized my problem exactly: It turned out very similar displays are sold, often without the seller specifying what model is being sold. So the OLED display SH1106 was the one I received and, if you use the SD1306 library with it, you get a garbled display.  Once I reverted to the right library, everything worked as expected. As usual, I would love not to make these mistakes, but this is a reminder about the importance of making sure what part you are buying EXACTLY!!...

Thonny with the ESP32

Image
 When I presented to my students the use and features of rshell so they can use it for MicroPython development they were not impressed at all. So I started to look for a Python GUI  that could work well with a ESP32 using MicroPython. I needed a multiplatform solution and then I saw an add on Udemy about an online course by Peter Dalmaris. I saw a sample video about Thonny software where I learned there is  a set of different platforms supported by that tool, as it can be used not only for Python programming on your PC but also on several MicroPython targets, such as the ESP32, which is supported out of the box. Easy to install and set up, I was sold from minute one, as it makes it easy to have access to the ESP32 filesystem. It can even upload MicroPython to the ESP32 so students do not need to fiddle with command-line esptool.py software.  I recommend you giving Thonny a go if you are using MicroPython on an ESP32. It even includes a serial plotter func...

Microptyhon on the ESP32: file management

Image
 While some boards using MicroPython have processors with built-in USB supports, the ESP32 is not one of those. That basically means the ESP32 needs an auxiliary chip to connect to a USB port. But it also means the preferred connection is to emulate a serial connection. Chips like the FTDI's USB to serial, or CP1202, or the CH340G, all are seen as a COM port on the PC side. And here is where the difference matters, as a serial communication matches well the REPL interpreter, but it also prevents the device to appear as any other device to your system (no mouse, no keyboard, no mass storage device). And that is a problem as MicroPython usually relies on the host system to have access to the local storage on the MicroPython device so different files and libraries can be edited a replaced during the development phase. What does no change, however, is that MicroPython still can have access to the local file system. Just try:  import os os.listdir() So, one way of dealing with this...

Extra memory for your F411 blackpill using Micropython

Image
 Like many of you, I bought a sample blackpill just for testing purposes with no special need to address. Later on, I learned that several flavors of Python were available for these boards and I gave them a try, both MicroPython and CircuitPython worked ok. But I read on the comments on a Hackaday entry about the board that the 8-pin chip that was not soldered in the bottom was a provision for an SPI flash memory. Again, I had no particular need for more memory, as the current 32KB flash drive that MicroPython exposed was ok, but you never know when you might need more memory. And sooner than later you find that need for extra memory. So I ordered a W25Q128F chip for around $1 and I soldered it to the board when it arrived.  However, none of the Python binaries I had changed the size of the exposed flash drive when I connected the USB to my computer. So I went on a quest to learn how to make it work . I failed to find meaningful references online until I visited the WeAct gith...

Coding 3D parts in Python using FreeCAD

Image
For quite a long time I have been a happy user of OpenSCAD software, mostly for designing 3D printed parts. For a recent project, I needed to create a complex geometry, and my starting point was a data file, so it made a lot of sense to that with a program.  Having been using OpenSCAD for a long time, I got the job done with it but creating the STL file took more than 10 hours. I could live with that, but I was not looking for an STL file as an output but a STEP or BREP file instead. So I started reviewing what I could do in Python using FreeCAD. It turned out that I could do a lot, but it was not as easy as using OpenSCAD. And it was not very fast either, but I could get it working in the end. The code below is what I used to create the model of the image of the cube, but for reasons unknown, all the shapes are hidden (not visible) when I open the file with FreeSCAD. It is very simple but, although there is a lot of documentation out there, I did not find all of it when I was look...

Processing 3.5 on the RPi4 (with OpenCV and Kinect support)

Image
Ten years ago I created with my friend Rubén Tortosa an art installation that would use a Kinect to capture the silhouette of a person standing in front of it. At the time, it was a PC running Ubuntu 10.10 and using Microsoft's Kinect camera. Microsoft wanted all of us to only use that camera with the Xbox game system. Thanks to the libfreenect library many of us did exactly the opposite.  That piece has gone through several exhibits and it is now starting to cough up every now and then. So I wanted to check if the new Raspberry Pi 4 was a possible candidate for replacing the PC.  I installed the 32-bit Jesse distro on a 16GB SD card and placed into my RPi4. I was able to install Processing on the Pi with this command-line:  curl https://processing.org/download/install-arm.sh | sudo sh The next step was to be able to use it, but as I was running a headless system, I could not rely on the local display. I am using Xvnc instead, so now I have a "virtual" screen I can acce...

The long and winding road of Raspberry Pi 4

Image
 A new project requires a Raspberry 4. It should be easy to get it working, I thought. But as the devil is in the details, my morning bumped into several major showstoppers: It turns out the new RPi4 comes with a micro-HDMI. That, of course, is not hidden information but something I should have paid attention to in advance, but I did not. So it was now when I realize it was not possible to use any display for the initial configuration of the board or for any of my tests.  I remembered that RPi's had a serial connection over the GPIO bus I could attach to. But it turns out that feature is now disabled by default on versions 3 and 4 of the RPi, as they use that hardware serial port for Bluetooth communications. It is possible to get it back with the enable_uart=1  line on /boot/config.txt Unfortunately, the brand new SD card I have got with the RPi4 did not work. I am not sure is was defective or whether it was damaged when trying to get it out from its packaging (Intenso ...

Prusa SL1 SLA 3D printer build and first impressions

Image
 I ordered this printer almost a year ago, but then the MINI appeared and I decided to get a MINI too, so my new order was delayed due to the MINI massive backlog. It was delivered last March, just at the beginning of the pandemic, so I thought I would have plenty of time to devote to it. But I was wrong and it has been sitting inside the box in our home's hall for several months.  To be honest, I knew the resin will be smelly so I was not eager to build this printer unless I had a use for it. That and the almost unavailable Isopropilic Alcohol (IPA) that was needed kept the project on hold. But given I finally got a good deal for IPA on Amazon something needed to be done. So last Saturday morning I started unpacking the several layers of foam with parts and went ahead building the Prusa SL1 printer. I would say it was simpler than the MK3, with lots of folded metal and machined aluminum parts and just a few 3D printed parts. Lots of screws and a good number of active parts an...

Road-trip time-lapse

Image
 A while ago I bought my second action camera, this time I made sure it could do a time-lapse video (something the first one I bought was not capable of). Anyway, the camera sat on a shelf for more than a year. But during the summer holidays, I was doing a trip and I thought it would be cool to create a  hyper-lapse of my drive. As usual, things went wrong when I was about to fix the camera to my car's windshield: it was not possible to fix it properly oriented, so the camera did the recording upside-down. I was not sure I could easily rotate the recording but I was positive I could rotate images so I decided to record the time-lapse as a sequence of JPG pictures. I checked there was enough memory available on the SD card and I connected the USB cable from the camera to one of the car's USB power sockets.  I stated the recoding and drove away. I could see the camera was doing its job and then I entirely forgot about it until we arrived at our destination four hours later...

Fan blades replacement

Image
I have two fans at home, one of them is quieter than the other. I assumed the reason was the shape and number of the blades, as the noisier one features a 3-blade rotor while the quieter one is a 5-blade one.  A good design exercise that might bring some real-life benefit if proved successful. So I went on and created a model using Onshape, that had to be able to be printed in the Prusa MINI. I designed two parts , the hub, and the blade, that will join with a dovetail.  While I did not do an exact copy of the quieter fan blades, I tried to stay as similar as possible. Which may not be good enough for the best results. It was also a project to explore the viability of the 3D printed approach. So this is what I designed:  To my amazement, 3D printing the blades really favored printing them all together, as the print time of each layer was so small if printing just one that the print needed to be slowed down. So printing five blades did only required around 3 times the prin...

First steps with a Duet 2 Wifi

Image
I have been testing a Duet 2 Wifi board lately. It is the first 3D printer / CNC controller board that I use that has a decent wireless upload speed. It is a well-thought-out board designed by David Crocker and Tony Lock, that features both an ARM ATSAM4E8E and ESP8266 module. The former handles the RepRapFirmware and the latter provides wireless connectivity to the mix.  The board features five silent stepper motor drivers and heaters and fan controllers to be used on 3D printers or CNC machines. The built-in socket for an SD card allows its usage not only to hold the firmware and website files but also user folders containing g-code files that can be uploaded and managed remotely through the built-in web server.  The only main problem for the newbie is SD card and board initialization, which should have been taken care of by the seller unless they are lousy. But the board I got did have an empty SD and no manual so I had to go Duet3.com site to get some answers in their Doc...

Remote shutdown your Python program

Image
One piece of code for a project is written in Python and it does what it was intended to do but, out of the blue, I am asked about the possibility of shutting it down remotely from another computer (code is running on a server where I do not want other users to be messing around). It was a perfect opportunity for using the threading library. So I went ahead and I wrote a small piece of code, encapsulated in a function, that will be run on a different thread. The main program is still doing its thing, but the new thread now creates a network socket and binds it to the proper IP address and port so it can accept connections from other computers over the network. When a new connection is made, the code will check if a special token is received, and if that is confirmed, it will shut down the whole program. Otherwise, the thread will loop forever in case new connections are made in the future. So the question is how to shut down the program. Usually, I use exit(0) to make my program ...

Uploading code wirelessly to Arduino Mega

Image
Given the same thing worked ok using an Arduino UNO form-factor board with both an AVR 328p and an ESP8266, I was expecting not much trouble getting the same thing to work for a similar board in the Arduino Mega format. Oh boy, I was wrong! The hardware modification part was easy: Find the diode whose cathode is connected to the RESET pin and remove it from the board. ( Board schematic ) I used GPIO12 as the ESP8266 pin to be used to reset the AVR processor (key for a remote upload). But once the hardware was working, it became obvious the software side of things was just not working. I could see no communication was ever successful between the ATMega2560 and avrdude program. Reset generation was not a problem as it was clear remote reset was working ok. Perhaps timing? Let us read about possible issues on github. It turns out this is old news, as ESP-Link is playing a trick to detect the attempt of a firmware upload so it can reset the AVR chip then. That detection was...

Uploading code to your Arduino board remotely

Image
A while ago I bought some Arduino UNO and Mega cards that featured, besides the usual processor, an on-board ESP8266 processor to bring Wi-Fi connectivity to them. These boards , have DIP switches to be able to program either the AVR (Arduino) processor or the ESP8266 using the USB port (think of them as a sort of serial port multiplexer). The main use for me was to be able to use them for different applications without using a USB cable. A [Wi-Fi]  TCP connection to port 23 would be used instead. As I am using ESP-Link firmware for the ESP8266. Do you want to print wirelessly on your 3D printer? You can do that with one of these Arduino Mega boards that can use Marlin. Using Pronterface software you can print to a TCP socket the same as if you print to a serial port. However, what intrigued me is that no mention was made in the boards I use about using the ESP8266 to upload new programs to the Arduino processor. And that was odd as ESP-Link software allows you to do that. H...