Posts

Learning new Java tools

Image
 While I have been using Java for almost 30 years, every now and then, I find new things I was not aware of in the Java toolset. Sometimes it is due to new libraries/classes; other times, it is brand-new tools.  I have been using Python lately, and I have found the use of an interpreter for testing code snippets very helpful. Unfortunately, that is not something you can do with Java, right? Well, that was the case till jshell was released. But what is jshell , let us say it is a Java's REPL. Like in Python, you can have an interactive session with the language interpreter, but now using Java.  How does it work? jshell is a command line tool you can find in OpenJDK or in Oracle's JDK since JDK 9 .  Not much different than Python, right? And you can ignore the semicolon at the end of each line :-) But it is more than just a calculator; you can instantiate any type of object, and it all persists in memory the whole session. It feels great to be able to have access to al...

Enforce line separator when using Scanner class in Java

Image
Parsing the data stream from a file or a socket can be very easy using the Scanner class. However, if you need to honor a given line separator sequence, using the nextLine() method can be problematic. The reason being the nextLine() method can accept a variety of line separators (like "\r\n", "\n", or "\r"). That behavior might be ok most of the time, but sometimes you may want to be sure that the line you are reading is precisely delimited by a given line separator and only by that one. The solution that works for me is not to use nextLine() but next()  after changing the token delimiter to the desired line separator. For example, I want to get a line read from the input delimited by "\r\n" only. ...  Scanner sc = new Scanner(s.getInputStream()).useDelimiter("\r\n");  String line = sc.next(); // before this was sc.nextLine(); ... Now full lines can be read as if they were a single token as now tokens are separated by the desired line s...

Replacing my MacBook Air

 My 2013 MacBook Air is still well and kicking, all but the battery is in good condition. I replaced the battery for a random one off Amazon and it was no good. Eventually the seller refunded my money after I reported the system would just cut off when the battery indicated around 55%. My guess is the power management was poor or the dialog with the laptop's control logic was not good so battery voltage and battery capacity were not interpreted properly. Whatever the reason, I was left with a computer that could be used only when battery was over 60% and that it can shut off anytime the number was below that. The old battery only lasted for less than one hour and I was not sure whether I would be any luckier buying another battery unless it came from Apple (which was pricier).  OTOH, that laptop had served me well for almost nine years and though it was a top of the line model (that was expensive at the time) with an i7, 8GB or RAM, and a 512GB SSD, I chose to look for a new m...

Set the time of Raspberry Pi Pico W using NTP

Image
 While the new RPi Pico W does not have a battery to keep the RTC, it does have something the previous model was lacking, network connectivity. So using the built-in Wifi module it can figure out the time and date from a network server using the Network Time Protocol (NTP).  It can work with it but the MicroPython binary I am using does not include a module for that at the moment (as the binary for ESP32 does) but it should not be a big deal to use that. As usual, it was easier to say than to do, but now I have it working. Please note that if you use the Thonny program, it will adjust the Pico real-time clock without warning you. So for a while, you may think it was your code that did it when it may well it is not the case. I just recycled some code I found but I was getting errors till I figured out the right offset for my board and timezone. You may need to tweak that to adjust it to yours. try: import usocket as socket except: import socket try: import ustruct...

Testing the ESP32-C3 ...

Image
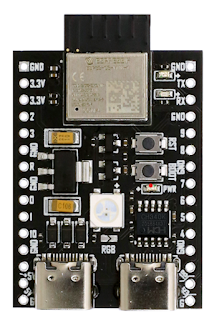
  Having used the ESP32 using both Arduino IDE and MicroPython, I have been quite happy with it. However, I have found MicroPython more stable and powerful, especially if multithreading is needed. Do not get me wrong, you can get multiple tasks in FreeRT too, but it gets tricky quickly.  ESP32 features a dual-core 240 MHz Xtensa 32-bit processor, but the ESP32-C3 changes that to a single-core 160 MHz RISC-V processor. They both keep the handy Wifi and Bluetooth interfaces and a nice collection of built-in peripherals and communication interfaces (SPI, I2C, I2S).  What I did not know was the new architecture was also supported by Micropython , which was a nice surprise. So I went on and bought one of them to give it a go. The system feels a bit less powerful than its dual-core sibling but it works nicely with Micropython nonetheless. Having fewer I/O pins available can be a problem for certain applications but I definitely recommend this device if you need a wifi-enable...

Crimpers, crimpers, crimpers, ...

 I happen to have bought a few crimpers over the years. I understand how convenient is to have a trusty connection using a crimper, but I have had trouble shelling out the hefty sum a brand-new required. Being mostly a hobbyist I had a difficult time accepting paying hundreds of dollars for a glorified set of pliers that I would use to make less than fifty contacts a year.  However, whenever I have had a hint that an affordable tool could do a reasonable job within a budget I have bought a new crimper. Most of the time to get a disappointing result, or a poor one at best. I usually deal with 2.54 mm DuPont and Molex connectors so I have bought SN-28B (actually twice by mistake), TU-190-8, and another one I bought from RS. The one from RS almost did the trick for DuPont but it crushed the top metal too flat so I needed to use some pliers so I could squeeze it into the plastic part. The two jaws did leave a small space on the side so I reckon the crimp was good but the geometry ...

The trusty ImageMagick package

Image
  Seven years ago I made a simple script to turn a pile of scanned exams into a personalized email for each student to get their marked exams. I used our photocopy machine that doubles as a scanner to create a large PDF file containing all the exams. ImageMagick's convert, identify and mogrify commands were used within the script for several massaging of the scanned pages but, years later, using WSL instead of a Linux machine, I was shown a weird error. None of the commands seemed to be able to handle a PDF file as a source anymore: identify-im6.q16: attempt to perform an operation not allowed by the security policy `PDF' @ error/constitute.c/IsCoderAuthorized/408. Luckily, I quick search lead me to a solution: just edit /etc/ImageMagick-6/policy.xml and enable PDF use, which was disabled as a safety feature as PDF can be an attack vector. More info .

Remote development of a hardware device

Image
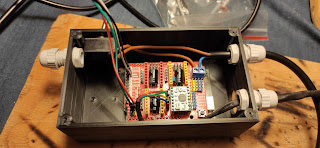
I am familiar with helping other people remotely using tools like TeamViewer. Many times it has to do with a friend having trouble with her computer, operating system, or software.  But quite recently, I took care of the development of a complete machine without ever touching it even once. The project was part of a friend's Ph.D. work about the proper tensioning of old paintings. He asked me for help with a specific need in mind. He needed a machine that could push a probe against a canvas surface while monitoring the back force generated.  As usual, there were a few more constraints, like it was needed to be used in a few weeks as an appointment was already made with an important European museum. And all the parts needed have to be available online to get quickly to my friend's residence in Rome. Fortunately, my friend can solder and wire or build a contraption, though he cannot code. So the plan was to make this happen by shipping all the parts to his apartment and he will d...

What is IDEX 3D printing all about?

Image
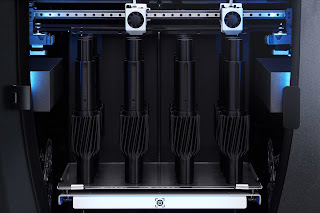
  While single extruder performance with BCN3D Epsilon W50 was not fast (around 20% slower than a Prusa MK3) its printing volume is significantly larger. So we put that to some u se, packing several large parts into the print bed.  If some of these parts are similar (either equal or mirrored) the use of IDEX can help here. So what is IDEX? IDEX is the acronym of independent dual extruders, which may not explain much yet.  These are 3d printers that have two print heads instead of one. Each one of these two print heads has its own extruder that can be operated independently from the other. This is quite a different thing than these other printers that can handle different filaments in the sense that here two extruders can operate at the same time, so two hotends can be pushing plastic onto the bed to create two different parts. Not very different as if you were able to write or draw with a pen on each one of your hands, but with a little catch here: although we can draw t...

When epsilon is actually quite large ...

Image
Before the summer holidays, we were approached by a Spanish company ( Sicnova )  that wanted to help us with our research project about modular 3D printed beams . So after some talks, we borrowed a brand new BCN3D Epsilon W50 3D printer.  Contrary to other printers and similar to an industrial robot, the machine was delivered over a wooden pallet that needed a manual forklift to move it to our lab. Overall volume was not very different from a washing machine or dishwasher. I went to the lab for unpacking it but returned empty-handed: the instructions called for two people for the unboxing procedure. So I had to return the next day with a colleague so we could remove the packaging and rise the printer to the workbench where it will live. Once the printer was powered on, we noticed the nice touch-sensitive display on the bottom-right corner, that greeted us and guide us through the setup procedure.  The printer has a USB, Ethernet, and WiFi connectivity, but we were not pr...

What happened to Meshlabserver?

Image
A few days ago, one reader comment on the blog (thank you Lance) made me aware of the changes happening with the Meshlabserver program. I misread the comment first as if the MeshLab project was discontinued, and after checking I replied back that a new released was just a few days old. But then it hit me, Lance was spot on,  MeshLab  project was deprecating the Meshlabserver program, now becoming "unsupported" and users were diverted to a new program called  PyMeshLab  which, as you all can guess, is now Python-based.   So that was interesting news for me as I have been using meshlabserver for various automation processes dealing with 3D meshes. And the even better news is that now installing it should be quite simple, just type pip3 install pymeshlab.  Linux and OSX install was uneventful and it all worked as expected. I learned that you could even use .mlx files created with Meshlab software. Windows 10 install was equally simple but, once I imported...

Upgrading from Prusa SL1 to SL1S

Image
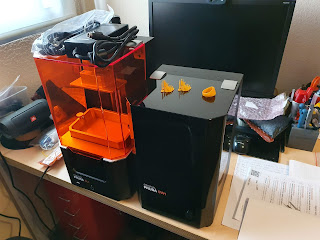
 A while ago I bought a Prusa SL1 resin printer with a washing and curing unit called CW1, both from Prusa Research. They came as a bundle and while the price was significantly higher than existing cheap SLA printers from China, I bit the bullet and went ahead with a more expensive set that I thought it will be worth it.  The printer I bought was a kit to be assembled and from the very beginning, I could see there were a lot of quality components and advanced features. All in all, I have used the printer only a fraction of what I use my FDM printers. The main reason being the messy process associated with resin, even if you have a cleaning and curing unit (that helps on that front). The smell of the resin is yet another detail I do not like, though it is not much worse than printing ABS. But recently I had the opportunity to install an upgrade to my SL1 printer. I have heard of different manufacturers replacing color LCD screens with monochrome ones, that while maybe more expe...

Garbled OLED display

I was testing the SD1306 MicroPython library for a small OLED display I just received. It uses the I2C bus and it is 128x64 pixels monochrome. I have used a smaller one before with that library and it seemed a no-brainer.   Unfortunately, I was not sure the unit was operational as it was brand-new and could be defective. I could only see the text I sent to the display for an instant and then only a fixed garbled background that was impossible to remove. I searched away until I found a Reddit post that summarized my problem exactly: It turned out very similar displays are sold, often without the seller specifying what model is being sold. So the OLED display SH1106 was the one I received and, if you use the SD1306 library with it, you get a garbled display.  Once I reverted to the right library, everything worked as expected. As usual, I would love not to make these mistakes, but this is a reminder about the importance of making sure what part you are buying EXACTLY!!...

Thonny with the ESP32

Image
 When I presented to my students the use and features of rshell so they can use it for MicroPython development they were not impressed at all. So I started to look for a Python GUI  that could work well with a ESP32 using MicroPython. I needed a multiplatform solution and then I saw an add on Udemy about an online course by Peter Dalmaris. I saw a sample video about Thonny software where I learned there is  a set of different platforms supported by that tool, as it can be used not only for Python programming on your PC but also on several MicroPython targets, such as the ESP32, which is supported out of the box. Easy to install and set up, I was sold from minute one, as it makes it easy to have access to the ESP32 filesystem. It can even upload MicroPython to the ESP32 so students do not need to fiddle with command-line esptool.py software.  I recommend you giving Thonny a go if you are using MicroPython on an ESP32. It even includes a serial plotter func...

Microptyhon on the ESP32: file management

Image
 While some boards using MicroPython have processors with built-in USB supports, the ESP32 is not one of those. That basically means the ESP32 needs an auxiliary chip to connect to a USB port. But it also means the preferred connection is to emulate a serial connection. Chips like the FTDI's USB to serial, or CP1202, or the CH340G, all are seen as a COM port on the PC side. And here is where the difference matters, as a serial communication matches well the REPL interpreter, but it also prevents the device to appear as any other device to your system (no mouse, no keyboard, no mass storage device). And that is a problem as MicroPython usually relies on the host system to have access to the local storage on the MicroPython device so different files and libraries can be edited a replaced during the development phase. What does no change, however, is that MicroPython still can have access to the local file system. Just try:  import os os.listdir() So, one way of dealing with this...

Extra memory for your F411 blackpill using Micropython

Image
 Like many of you, I bought a sample blackpill just for testing purposes with no special need to address. Later on, I learned that several flavors of Python were available for these boards and I gave them a try, both MicroPython and CircuitPython worked ok. But I read on the comments on a Hackaday entry about the board that the 8-pin chip that was not soldered in the bottom was a provision for an SPI flash memory. Again, I had no particular need for more memory, as the current 32KB flash drive that MicroPython exposed was ok, but you never know when you might need more memory. And sooner than later you find that need for extra memory. So I ordered a W25Q128F chip for around $1 and I soldered it to the board when it arrived.  However, none of the Python binaries I had changed the size of the exposed flash drive when I connected the USB to my computer. So I went on a quest to learn how to make it work . I failed to find meaningful references online until I visited the WeAct gith...

Coding 3D parts in Python using FreeCAD

Image
For quite a long time I have been a happy user of OpenSCAD software, mostly for designing 3D printed parts. For a recent project, I needed to create a complex geometry, and my starting point was a data file, so it made a lot of sense to that with a program.  Having been using OpenSCAD for a long time, I got the job done with it but creating the STL file took more than 10 hours. I could live with that, but I was not looking for an STL file as an output but a STEP or BREP file instead. So I started reviewing what I could do in Python using FreeCAD. It turned out that I could do a lot, but it was not as easy as using OpenSCAD. And it was not very fast either, but I could get it working in the end. The code below is what I used to create the model of the image of the cube, but for reasons unknown, all the shapes are hidden (not visible) when I open the file with FreeSCAD. It is very simple but, although there is a lot of documentation out there, I did not find all of it when I was look...

Processing 3.5 on the RPi4 (with OpenCV and Kinect support)

Image
Ten years ago I created with my friend Rubén Tortosa an art installation that would use a Kinect to capture the silhouette of a person standing in front of it. At the time, it was a PC running Ubuntu 10.10 and using Microsoft's Kinect camera. Microsoft wanted all of us to only use that camera with the Xbox game system. Thanks to the libfreenect library many of us did exactly the opposite.  That piece has gone through several exhibits and it is now starting to cough up every now and then. So I wanted to check if the new Raspberry Pi 4 was a possible candidate for replacing the PC.  I installed the 32-bit Jesse distro on a 16GB SD card and placed into my RPi4. I was able to install Processing on the Pi with this command-line:  curl https://processing.org/download/install-arm.sh | sudo sh The next step was to be able to use it, but as I was running a headless system, I could not rely on the local display. I am using Xvnc instead, so now I have a "virtual" screen I can acce...

The long and winding road of Raspberry Pi 4

Image
 A new project requires a Raspberry 4. It should be easy to get it working, I thought. But as the devil is in the details, my morning bumped into several major showstoppers: It turns out the new RPi4 comes with a micro-HDMI. That, of course, is not hidden information but something I should have paid attention to in advance, but I did not. So it was now when I realize it was not possible to use any display for the initial configuration of the board or for any of my tests.  I remembered that RPi's had a serial connection over the GPIO bus I could attach to. But it turns out that feature is now disabled by default on versions 3 and 4 of the RPi, as they use that hardware serial port for Bluetooth communications. It is possible to get it back with the enable_uart=1  line on /boot/config.txt Unfortunately, the brand new SD card I have got with the RPi4 did not work. I am not sure is was defective or whether it was damaged when trying to get it out from its packaging (Intenso ...

Prusa SL1 SLA 3D printer build and first impressions

Image
 I ordered this printer almost a year ago, but then the MINI appeared and I decided to get a MINI too, so my new order was delayed due to the MINI massive backlog. It was delivered last March, just at the beginning of the pandemic, so I thought I would have plenty of time to devote to it. But I was wrong and it has been sitting inside the box in our home's hall for several months.  To be honest, I knew the resin will be smelly so I was not eager to build this printer unless I had a use for it. That and the almost unavailable Isopropilic Alcohol (IPA) that was needed kept the project on hold. But given I finally got a good deal for IPA on Amazon something needed to be done. So last Saturday morning I started unpacking the several layers of foam with parts and went ahead building the Prusa SL1 printer. I would say it was simpler than the MK3, with lots of folded metal and machined aluminum parts and just a few 3D printed parts. Lots of screws and a good number of active parts an...